The Case Facade And Figures · Volume 5
The Case, Façade & Figures — Vol 05: Decoration & Finish
Vol 04 built the façade as a structure: the front board, the display-pipe field, the fretwork grille kept acoustically open, the name board and the corner spandrels, laid out on the 46-key-Chiappa-modelled 30 in × 24 in (762 mm × 610 mm) hobby front (jsart11, Ken Rawlings). That volume left the front raw — plywood, MDF and bare wood, correct in proportion but the colour of a lumber yard. This volume is about turning that raw front into something a crowd crosses a fairground to look at: the carving and scrollwork, the gilded lettering, the painting, and — for the very large fraction of builders who do not carve or paint freehand — the transfer, decoupage and resin-casting shortcuts that reach the same effect by other means. It closes with the finishes that make all of it survive a life spent outdoors.
Scope and framing. This is the decoration of the front described in Vol 04; it does not re-open the structure. It covers surface craft only — what goes onto the wood and how it is protected — and hands two things off: the moving figures and their drive (the conductor, the bandmaster, the monkey) belong to Vol 06, and this volume touches the resin-cast route only where it is a decoration choice for a non-carver, cross-referring Vol 06 for the mechanism that makes the figure move. The grand fairground/Dutch- street decorative canon — the full proscenium of columns, cresting, carved caryatids and gilded scroll — is context here and is surveyed in Dive 14 (Fairground & Dutch Street Organs); this volume stays at busker scale. Imperial source figures (jsart11, jsart60) are kept and the metric added. Every non-obvious value carries its source; unconfirmed norms are marked (est.).
5.1 Two routes to the same front
Every decoration decision on a small organ forks on one question: does the builder carve and paint, or not? The hobby corpus is unusually honest about this, because it is written by people who found out the hard way. The 31-note builder tried Bauernmalerei freehand, failed at it, and switched to a laser-print transfer (en_31toets). Wallace Venable’s whole decoupage method exists because he wanted a decorated organ without being a painter or a carver (jsart60, Wallace Venable). The John Smith Conductor is sold explicitly for builders who, in the project’s own words, “are not a wood carver” (jsart109).
So the useful framing is a menu keyed to skill and tools, where every item produces a front that reads correctly from three paces — which, for a street instrument worked in the open, is the only viewing distance that matters. The two routes are:
- The maker’s route — carve and paint. Scrollwork sawn and carved from sheet and solid stock, glued in relief to the front board; lettering fretsawn and gilded; florals, cherubs and grain-work hand-painted (jsart11, jsart38). This wants a bandsaw or fretsaw, carving tools, a steady painting hand, and the most time. It also gives the most convincing, most original result.
- The non-carver’s route — transfer, apply, cast. The same visual vocabulary reached without carving or freehand painting: Bauernmalerei by laser-print transfer then hand-coloured (en_31toets); decoupage of printed art under a PVA/varnish coat (jsart60); and resin-cast ornament and figures from silicone moulds (jsart109). This wants a printer, a craft knife, glue and patience — tools a modeller already owns — and reaches a good front far faster.
The two routes mix freely. A common hybrid is a carved and gilded name board (the one element that most rewards real relief and real gold) over a decoupaged or transfer-decorated field (the large areas that most reward not painting by hand). Figure 5-1 lays the menu out as a decision map.
Figure 5-1. The decoration menu as a decision map. The single fork is whether the builder carves and paints. The maker’s route (left) produces sawn-and-carved relief, gilded lettering and hand-painting; the non-carver’s route (right) reaches the same look through laser-print transfer, decoupage or resin casting. All routes converge on the same sealing and weatherproofing step (§8), because a street organ lives outdoors whatever put the decoration on it. Tool lists are the typical minimum (est.); the routes mix — a carved gilded name board over a decoupaged field is common.
5.2 Carving and scrollwork — the maker’s route
The canonical hobby fair-organ front is Ken Rawlings’ (jsart11). It is worth following in detail because it names every stock and every operation, and because its logic — make the ornament as separate relief pieces, then glue them to a thin backboard — is what makes an ambitious front achievable on a home bandsaw.
5.2.1 The backboard and the relief-on-backboard principle
The front is built up, not carved from a solid slab. A thin backboard carries everything: on the fair-organ front it is 6 mm plywood (jsart11, Ken Rawlings), the same order of thickness as the front board of Vol 04. The ornament is made as individual pieces and glued proud of that board, so the relief you see is the thickness of the applied piece, not wood removed from a solid. This is why a builder with a bandsaw and a fretsaw — but no ability to hog out a deep relief carving — can still produce a front that reads as carved: each scroll, spandrel and letter is a flat or lightly-carved piece standing off the board, and the shadow lines between the pieces do the rest.
The animated ‘Storybook’ front takes the same idea further and builds the whole front from 3/32 in (2.4 mm) plywood scroll-sawn and layered for relief (jsart38) — thin plies stacked and offset so the depth is achieved in laminations rather than in carving. Both fronts prove the same point: relief on a busker organ is assembled, not excavated.
5.2.2 Scrollwork — bandsawn and fretsawn from sheet stock
The large decorative scrolls — the swept, foliate shapes that frame the front and soften every hard corner — are cut from sheet stock and then shaped:
- The scrollwork proper is bandsawn from 10, 12 and 15 mm MDF (jsart11, Ken Rawlings). MDF is chosen deliberately: it has no grain to tear out, it takes a crisp sawn edge, it carves and sands to a rounded section without splitting, and it paints to a dead-smooth finish. The three thicknesses give three depths of relief on the same front, so scrolls can sit at different heights and read as layered rather than flat. Each piece is bandsawn to its outline, then carved to shape and section — the flat sawn blank rounded over and undercut so it looks like turned or carved timber — and glued to the backboard (jsart11).
- The front scrolls are fretsawn from pine (jsart11). Where a scroll is fine enough that a bandsaw blade cannot follow it — tight internal curves, pierced work — it is cut with a fretsaw (a fine-bladed scroll saw) from solid pine, which holds a delicate profile better than MDF at small sizes.
MDF for the bulk scroll and pine for the fine fret is a sound division of labour: MDF where you want mass, smoothness and no grain; solid softwood where you want a thin piercing to survive handling.
5.2.3 Corner spandrels in mahogany
The corner spandrels — the carved triangular fillers that sit in the corners beside an arch or scroll (see the Vol 04 glossary) — are fretsawn from 1/4 in (6.35 mm) mahogany (jsart11, Ken Rawlings). Mahogany is the one solid hardwood called out on the front, and it earns its place at the corners: it holds fine carved detail, it will not crumble at a thin fretsawn point the way MDF can, and if any part of the front is to be shown as polished wood rather than painted, the mahogany spandrels are the natural candidates. At 1/4 in they are thicker than the MDF scroll stock, giving the corners the deepest relief on the front — the right instinct, since corners are where the eye expects the frame to be heaviest.
5.2.4 The bandmaster figure carved from MDF
The fair-organ front also carries a bandmaster carved from MDF and other woods, painted and gilded, which “beats time and moves his head” (jsart11, Ken Rawlings). This is a carved figure — the maker’s-route counterpart to the resin-cast conductor of §7 — and it is decorated exactly like the rest of the front: carved to shape, painted, and gilded. The mechanism that beats the time and turns the head is a moving-figure drive and belongs to Vol 06; here the point is only that the same MDF-and-carve, paint-and-gild discipline that makes the scrollwork also makes the figure, so a builder committed to the maker’s route need learn only one decoration skill set for the whole front.
5.3 Gilded lettering — the name board
The name board is the one element that most rewards real gold, and the hobby method reaches it without a sign-writer’s skill:
The lettering is fretsawn from 1/16 in (1.6 mm) plywood and gilded with 24-carat gold leaf (jsart11, Ken Rawlings). Each letter is cut as a separate thin ply blank on the fretsaw, glued to the name board (or to a contrasting ground), and then leafed. Because the letters are physical pieces standing proud of the board, they catch light on their edges as well as their faces — a raised gilded letter reads far more strongly outdoors than gold paint on a flat surface, and it does not depend on the builder being able to paint a clean letterform, only to saw one. A paper pattern glued to the ply and fretsawn through gives crisp, repeatable letters.
Gilding in true leaf is a specific, learnable process rather than a painting skill:
- Seal and smooth the ply letter so it is non-absorbent — leaf shows every flaw beneath it.
- Lay a gold size (an oil- or water-based adhesive) and let it come to the correct tack — dry enough not to drown the leaf, wet enough to grip it.
- Lay the leaf — 24-carat leaf is a few ten-thousandths of a millimetre thick and handled with a gilder’s tip and cushion — onto the tacky size, press it down, and skew off the surplus with a soft brush once the size is hard.
- Burnish or seal as wanted; true 24-ct gold does not tarnish, which is exactly why it is chosen for an object that lives outdoors (est. — the source states the leaf and carat, not the size system).
For builders unwilling to buy and handle genuine leaf, §8 lists gold acrylic and imitation (Dutch-metal) leaf as the lower-cost stand-ins — with the caveat that imitation metal will tarnish outdoors and must be sealed, whereas true gold need not.
5.4 Painting — florals, cherubs and grain
Hand-painting is where the maker’s route asks the most, and where the hobby sources are most relaxed about materials.
5.4.1 Paint used
The fair-organ front is painted with left-over household paint (jsart11, Ken Rawlings) — ordinary trade emulsion and gloss, whatever is in the shed. This is a deliberate lesson: at three-pace viewing distance on a street front, the design carries the front, not the pedigree of the paint. The ‘Storybook’ front uses enamels (jsart38). Both are opaque, cover MDF and ply well, and are cheap enough to experiment with.
5.4.2 Florals and cherubs
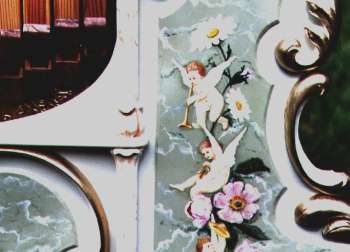
The fair-organ front carries hand-painted floral designs and cherubs (jsart11, Ken Rawlings) — the classic organ-front vocabulary. For a builder who can draw, these are painted freehand. For a builder who cannot, this is precisely the motif that the transfer and decoupage routes of §5–§6 exist to supply: a laser-printed cherub or floral, transferred or glued down and then tidied with a brush, reaches the same front without freehand drawing. The maker’s route and the non-carver’s route are, at this point, two ways of putting the same picture on the wood.
5.4.3 Rubbing back to reveal grain
The ‘Storybook’ front uses a technique worth calling out on its own: it is painted in enamels, with the paint rubbed off wet to reveal the grain beneath (jsart38). The wood is painted, then — before the enamel sets — wiped back so the colour stays in the grain and low spots while the raised grain shows through. The result is a coloured-but-woody surface, part paint and part visible timber, that looks aged and hand-worked rather than flatly painted. It is a low-skill, high-effect trick: it depends on timing the wipe, not on brush control.
5.5 Bauernmalerei by laser-print transfer — the non-carver’s painting
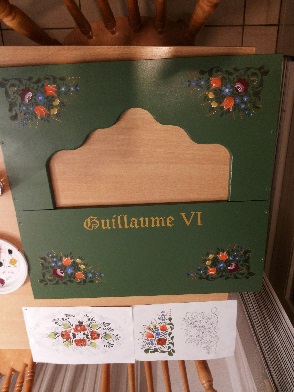
Bauernmalerei — literally “farmer’s painting,” the South-German/Black-Forest folk-painting tradition of bright flowers, scrolls and figures on a coloured ground — is the decorative idiom of the South-German (Black Forest) design that the 31-note builder chose for the case (en_31toets). It is also genuinely hard to paint freehand, and the source is candid that the first freehand attempts failed (en_31toets). The fix is a laser-print transfer, and it is the single most useful technique in this volume for a non-painter, because it puts a clean, correct outline on the wood that anyone can then colour in.
5.5.1 The transfer method
The method exploits the fact that a laser print is toner — a plastic powder fused to the paper — which thinner will re-mobilise, unlike ink-jet dye. The steps (en_31toets):
- Print the image on a laser printer. It must be laser (toner), not ink-jet; and because the toner is laid down mirror-wise when transferred, print the image reversed if it contains text or must not be handed (est. — a standard transfer requirement; the source describes the wipe-through method).
- Lay the print face-down on the prepared wood, exactly where the motif is to sit, and hold it still.
- Wipe through the back with thinner (cellulose thinner / white spirit) so the solvent soaks the paper and softens the toner; the outline transfers to the wood as the toner releases from the paper onto the surface.
- Lift the paper to reveal the transferred outline, and hand-colour it — filling the transferred line-work with paint, exactly as one would colour a printed outline (en_31toets).
The transfer supplies the drawing — the hard part for a non-artist — leaving only the colouring, which needs no drafting skill. Figure 5-2 lays the four steps out.
Figure 5-2. The laser-print transfer that lets a non-painter apply Bauernmalerei. A laser (toner) print is laid face-down on the prepared wood; wiping through the back with thinner re-mobilises the toner so the outline releases onto the surface; the paper is lifted and the transferred line-work hand-coloured (en_31toets). Reversing the print (step 1) so text reads correctly after transfer is the standard requirement (est.). Ink-jet prints will not work — the method needs toner, not dye.
5.6 Decoupage — printed art under glue
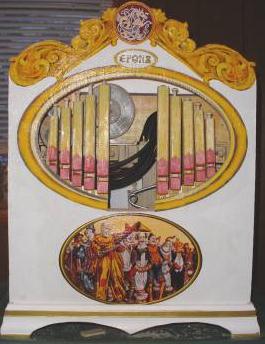
Wallace Venable’s decoupage method is the most fully-documented non-carver route in the corpus, and it produces a complete decorated front — field, badges, plate and framed ends — with no carving and no freehand painting at all (jsart60, Wallace Venable).
5.6.1 The principle
Decoupage is the craft of gluing printed or cut paper art to a surface and then sealing it under coats of clear medium until the paper edge disappears and the whole reads as one decorated surface. Venable’s medium is Mod-Podge, a PVA (poly-vinyl-acetate) product that both glues the art down and, in further coats, varnishes over it (jsart60, Wallace Venable). PVA is the same adhesive family used throughout organ building for its water-clean-up and strong wood bond; as a decoupage medium it dries clear and can be built up in layers.
5.6.2 The art — scanned posters, colour-laser printed
The decoration is Venable’s own illustration built from scanned historic circus posters (jsart60, Wallace Venable). This is the decoupage counterpart to the transfer route’s motif library: instead of drawing the ornament, the builder sources it — period circus and fairground graphics scan and print beautifully and carry exactly the right visual register for a street organ.
Two production notes matter:
- Print on a colour laser printer, not ink-jet, for water resistance (jsart60, Wallace Venable). Laser toner is a fused plastic and shrugs off the damp far better than ink-jet dye, which can bleed or run when the varnish medium wets it and when the finished organ meets weather. This is the same toner-versus-dye logic as the transfer route (§5), applied here for durability rather than transferability.
- Seal the print before gluing (est.) so the medium does not lift the toner or the paper fibres — a standard decoupage precaution; the source’s emphasis on laser for water resistance points the same way.
5.6.3 The front as an assembly of elements
Venable’s front is a white-painted plywood panel carrying seven applied elements (jsart60, Wallace Venable). Building the front as a painted ground plus a small number of discrete applied pieces — rather than one continuous painting — is what makes it achievable: each element is printed, cut and glued independently, and the white ground ties them together. The named elements are:
- an oval (a framed central medallion) and a name badge — the decoupage equivalent of the carved-and-gilded name board of §3;
- a deliberately left gap for the conductor figure (jsart60, Wallace Venable) — the decoration is laid out around where the moving figure will stand, so the front and the automaton are designed together (the figure itself is Vol 06);
- a Builder’s Plate on the back (jsart60) — the maker’s mark, the street-organ tradition of signing the instrument;
- ends framed in gold-painted wood (jsart60, Wallace Venable) — the case ends finished with a gold-painted wooden frame, so the decoupaged front is bordered in gold without any gilding or carving.
The result is a front that reads as richly decorated — medallion, name, gilt frame, builder’s plate — assembled entirely from printed art, paint and glue.
5.7 Resin-cast ornament and figures — for the non-carver
The third non-carver route replaces carving with casting. The John Smith Conductor Project is a high-quality, reproducible animated conductor created for builders who — in the project’s own framing — “are not a wood carver” (jsart109). Its relevance here, in the decoration volume, is the casting process as a way to obtain ornament; its relevance to Vol 06 is the mechanism that makes the conductor conduct.
5.7.1 Sculpt → silicone mould → resin cast
The workflow is the standard model-maker’s reproduction chain (jsart109):
- Sculpt the master once — the figure (or an ornament, a corbel, a crest) is modelled in a sculpting medium to final form. This is the one step that needs real modelling skill, and the point of the kit is that someone else has already done it — the builder buys the casting kit rather than sculpting the master.
- Make a silicone mould from the master — a flexible RTV-silicone negative that captures fine detail and releases cleanly.
- Cast in resin — a two-part polyurethane or polyester resin poured into the mould, reproducing the master as often as wanted. The kit includes “control arms for movement” and a baton (jsart109) — the parts that make the cast conductor a moving figure.
The advantage over carving is exact reproducibility with the hard sculpting done once (or bought in): a builder who could never carve a convincing face can cast one. The same chain casts non-figurative ornament — repeated spandrels, rosettes, a matched pair of finials — where the maker’s route would demand carving each by hand.
5.7.2 Finishing a resin casting
A raw resin casting is decorated like any other front element: primed (resin needs a primer coat for paint to key to it), then painted in acrylic or enamel, and gilded where gold is wanted — the cast conductor is painted and, following the carved bandmaster’s example (jsart11), can be gilded to match the front. Sealing follows §8 like everything else.
Where the resin route reappears. This volume treats the cast figure as a decoration choice — how a non-carver obtains a figure that matches the front. Installing and driving that figure — mounting it on the fixed lid, the control-arms linkage that beats time and moves the head, the coin trigger — is Vol 06, and the resin conductor is the worked example there (jsart109 / jsart122). Decorate the casting to match the front here; make it move there.
5.8 Finishes and weatherproofing
Whatever put the decoration on the wood, a street organ lives outdoors — it is worked in the open, carried in and out, and stored in a shed or a garage, not a climate-controlled case. The finish is therefore not cosmetic; it is what keeps the case from moving, the joints from opening, and the decoration from lifting. Table 5-1 collects the finishes the corpus names and what each is for.
5.8.1 The finishes menu
Table 1 — 8.1 The finishes menu
| Finish | What it is | Used for (source) | Weather note |
|---|---|---|---|
| Enamel | Solvent-based opaque gloss/satin paint | Painting the layered front; rubbed off wet to reveal grain (jsart38) | Tough, water-shedding; good outdoor topcoat over primer |
| Household paint | Trade emulsion / gloss | Painting scrollwork and florals cheaply (jsart11) | Emulsion needs sealing; gloss sheds water — prime bare MDF first (est.) |
| Acrylic craft paint | Water-based pigment | Colouring transfers, decoupage elements, resin castings (est., general) | Flexible, low-odour; must be sealed with varnish outdoors |
| Danish oil | Penetrating oil/resin blend | Sealing the layered ‘Storybook’ front (jsart38) | Penetrates and seals wood; renewable, but not a hard weather shell on its own |
| Varnish / clear coat | Clear film finish (oil or PU) | Sealing decoupage over Mod-Podge; topcoat over paint (jsart60) | The main weather barrier — build several coats over decoration |
| Mod-Podge (PVA) | Water-based PVA medium | Decoupage glue and seal coats (jsart60) | Water-clean-up; not waterproof alone — overcoat with varnish for outdoors (est.) |
| 24-ct gold leaf | Genuine gold leaf on size | Gilded name-board lettering, figures (jsart11) | Does not tarnish — the reason true gold is chosen for an outdoor object |
| Gold acrylic / imitation leaf | Gold-pigment paint or Dutch-metal leaf | Gold-painted end frames; low-cost gilding (jsart60) | Imitation metal tarnishes — must be sealed; acrylic gold needs a clear coat |
Table 5-1. The decoration-and-finish menu drawn from the hobby corpus. Sources: enamels and rub-back and Danish oil (jsart38); household paint, gilded lettering, scroll-carving (jsart11, Ken Rawlings); Mod-Podge/PVA, colour-laser art, gold- painted frames (jsart60, Wallace Venable); laser-print transfer for painting (en_31toets). Weather notes marked (est.) are general finishing practice, not a source claim.
5.8.2 Sealing for a life outdoors
The corpus gives two explicit durability moves, and the rest is standard finishing logic:
- Choose finishes and inks that resist water. The decoupage route prints its art on a colour laser printer specifically for better water resistance than ink-jet (jsart60, Wallace Venable) — the single most important durability decision in the whole non-carver route, because a run of ink-jet dye ruins the art the first time the organ meets damp.
- Seal the decoration under a clear film. The layered front is sealed with Danish oil (jsart38); the decoupage front is built up in Mod-Podge/PVA and varnish coats over the art (jsart60). Whatever the decoration, the last job is to put a clear weather barrier over all of it — varnish or a hard clear coat over paint and over any water-based work (acrylic, emulsion, Mod-Podge, imitation gilding), because those are not weatherproof on their own (est., general practice).
A workable outdoor finishing order for any route (est., synthesising the sources): seal the bare wood (oil, primer or sealer as appropriate to the stock) → apply the decoration (paint, transfer, decoupage or cast element) → let it cure fully → build several coats of clear varnish over everything, keying between coats → renew the clear coat periodically as the organ is worked. True 24-ct gold leaf is the one element exempt from the “seal it or it tarnishes” rule; everything else on a street organ wants the clear barrier.
5.8.3 A realistic menu by skill level
Pulling the volume together, the practical recommendation keyed to skill:
- Confident carver and painter → the maker’s route (§2–§4): bandsawn/fretsawn MDF-and-pine scrollwork, mahogany spandrels, fretsawn gilded lettering, hand-painted florals and cherubs, sealed and varnished. Most time, most original, most convincing (jsart11, jsart38).
- Can paint a bit, cannot draw → Bauernmalerei by laser-print transfer (§5): the transfer supplies the drawing, the builder supplies the colour (en_31toets).
- Neither carves nor paints → decoupage (§6): scanned/printed art on a white-painted ground under Mod-Podge and varnish, gold-painted end frames, a printed name badge and builder’s plate (jsart60).
- Wants a figure but cannot carve one → the resin-cast conductor (§7): buy the casting kit, cast, prime, paint and gild to match the front (jsart109) — then drive it per Vol 06.
Every one of these ends at the same place: a front that reads correctly from three paces and a finish that survives the weather. That is the whole job of this volume.
Cross-references: Vol 04 (the façade this volume decorates — front board, display-pipe field, fretwork grille, name board and spandrel structure, the 30 in × 24 in / 46-key-Chiappa hobby front); Vol 06 (moving figures & automata — the drive for the carved bandmaster of §2.4 and the resin-cast conductor of §7, including the control-arms linkage and coin trigger); Vol 02–03 (the case and its internal packaging the front is fixed to). Grand fairground/Dutch-street decorative canon — the full proscenium of columns, cresting and gilded carving — is context only and is surveyed in Dive 14 (Fairground & Dutch Street Organs). Sources: jsart11 (Ken Rawlings, decoration & fair-organ front), jsart38 (‘Storybook’ front — enamels, rub-back, Danish oil), jsart60 (Wallace Venable, decoupage), jsart109 (John Smith Conductor — resin casting), en_31toets (Bauernmalerei laser-print transfer).
Comments (0)