Fender Rhodes Stage 88 · Volume 7
Fender Rhodes Stage 88 — Vol 07: Voicing & Tone
This is the voicing volume of the refurbishment bench manual — the by-ear art half of regulation, where the mechanically correct fork built in Vol 05 and the regulated action of Vol 06 are turned into an even, singing, “barking” scale. Vol 05 set the coarse mechanical foundation (the tine cut and tuned, the tonebar squared and aimed at its pickup, the Timbre Adjustment Screw run in “until the end of the Tine rests on a plane slightly above dead center of the Pickup,” and the level reset at the pickup arm). This volume is the fine refinement of those same two settings, done note by note with the ear as the final judge. Nothing here is a new tool or a new screw — it is the same Timbre Adjustment Screw and the same Volume Adjustment Screw from Vol 05, set this time to a musical target rather than a mechanical one.
Note: Voicing couples three variables that must be held apart on the bench even though they are heard together: hammer-tip hardness (set in Vol 06 §“Hammer tips”), the tine’s vertical position relative to the pickup centerline (the Timbre Adjustment Screw — sets harmonic content), and the tine-to-pickup gap (the Volume Adjustment Screw sliding the pickup arm — sets level and dynamics). Pitch is not voiced here: after any tine bending or height change the pitch is re-checked on a strobe, and the tuning procedure itself is Vol 08. Every clearance below is given in fractional inch and millimetre.
7.1 What voicing is
Voicing is the by-ear coupling of three adjustments into one even scale. The pickup physics it works on were established in Vol 02 §“The electromagnetic pickup”: each tine vibrates in front of a magnetized pole piece, and two geometric relationships decide what the coil delivers. Tine vertical position vs. the pickup centerline sets harmonic content — where the tine sits in front of the tapered pole tip changes the symmetry of the induced waveform and therefore its fundamental-to-overtone balance (mat.ucsb.edu, Shear; Vol 02 §“The electromagnetic pickup”). The tine-to-pickup gap sets level — the closer the tine rests to the pole face, the stronger the flux modulation and the louder, more dynamic the note (fenderrhodes.com, Chapter Four; Vol 02 §“The electromagnetic pickup”).
The audible goal of putting all three right is “the bark” — “the signature tone of the Rhodes that distinguishes it from other electric pianos,” which “is produced by the overtones generated by the Rhodes’ tine and tone bar when proper escapement and pickup distance is set to capture these overtones within their magnetic fields.” Set correctly, “the dynamic range of the bark can be set such that the player can bring out more or less bark with more or less forte” — i.e. the bark lives in the dynamic response, not in a single static setting (chicagoelectricpiano.com, The Fender Rhodes “Bark”).
Note: Voicing is the third of three deliberately separated bench passes. Coarse alignment (tine square and centered, Timbre screw to “slightly above dead center,” level reset at the pickup arm) is Vol 05 §“Mounting & coarse alignment”; action regulation (key dip, escapement/blow distance, strike line, dampers, hammer tips) is Vol 06; and retuning the keyboard after any parts or voicing work is Vol 08. Voicing assumes the mechanics of Vol 05 and Vol 06 are already final — a tine voiced over a swaying tonebar or an unregulated escapement is voiced onto a moving target.
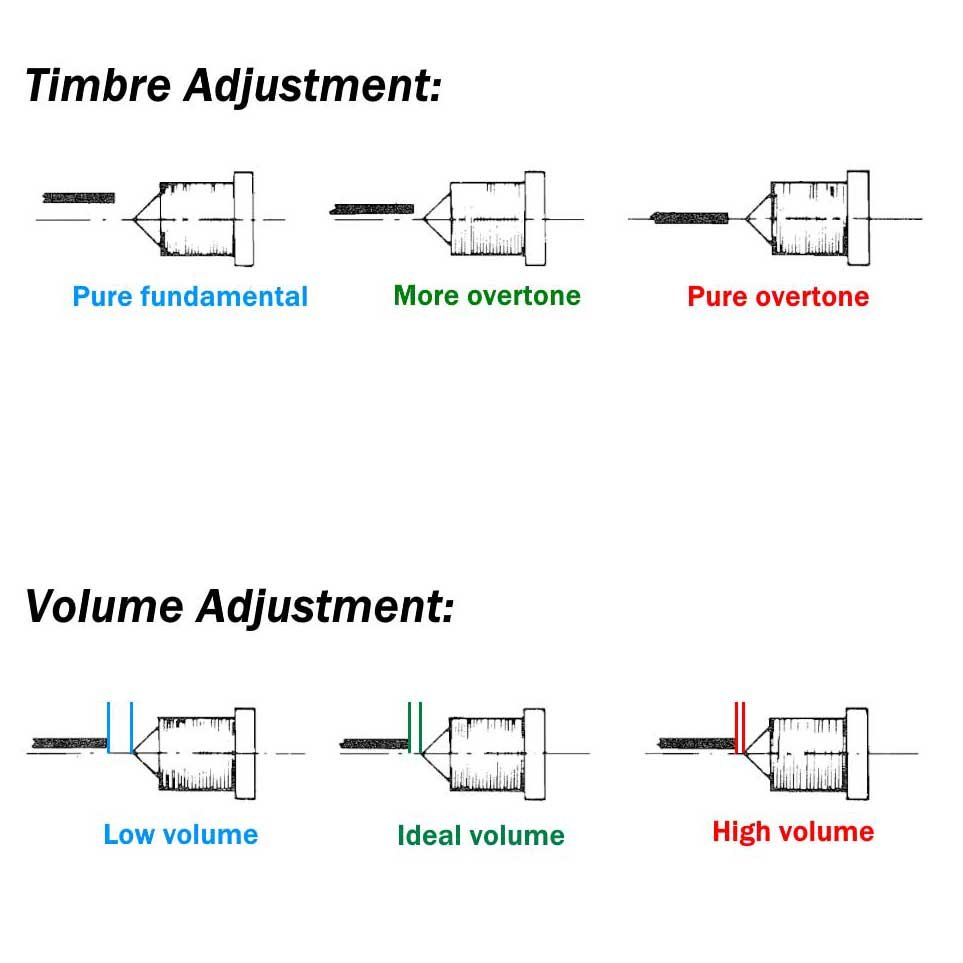
7.2 Tine vertical alignment — the bark
The Timbre Adjustment Screw (the front tonebar mounting screw, turned with the #2 Phillips screwdriver) raises or lowers the front of the tonebar, which moves the tine’s resting height relative to the pickup’s pole-tip centerline. The factory target is unambiguous: set it “until the end of the Tine rests on a plane slightly above dead center of the Pickup” (fenderrhodes.com, Chapter Four). That “slightly above center” target is what produces the bark — enough off-center bias to let the fundamental and the tine/tonebar overtones both speak.
The physics under the target (Vol 02 §“The electromagnetic pickup”): with the tine dead-centered on the pole, it swings symmetrically to either side of the tip, the flux rises and falls twice per cycle, and the output is doubled toward the octave — a thin, hollow voice weighted to the even harmonics. Biasing the tine off dead center breaks that symmetry and brings the fundamental back, but the bias is not symmetric about the centerline: the hammer strikes the tine from below, so the struck tine’s swing is biased upward and sweeps up through the pole-tip plane. That is why the factory target is slightly above center — there the upward-biased swing crosses the pole evenly, and the fundamental and the characteristic overtone “bark” both speak. Push the tine too far above center and the fundamental swamps the overtones — the note goes dull and muddy. Drop it at or below center and the upward-biased swing barely crosses the pole at all, so the note reads thin and weak (mat.ucsb.edu, Shear; chicagoelectricpiano.com; the end-state descriptors — dull/muddy, hollow, thin — are the field convention, est.).
Warn: Voice tine height at the Timbre Adjustment Screw, not by bending the tine up or down toward the pickup. Bending the tine to chase a brighter or darker note corrupts its rest geometry and its pitch — and the manual is explicit that “when Timbre and Volume Adjustments are made, Pitch should be re-established” (fenderrhodes.com, Chapter Four). Set height with the screw, set level at the pickup arm (next section), and verify pitch on a strobe after any tine is bent or moved (the tuning method is Vol 08). Bending tines to voice is the classic way a scale ends up uneven and out of tune at once.
7.3 Tine-to-pickup gap — level & dynamics
The Volume Adjustment Screw clamps the pickup arm; loosening it with the ¼″ (6.350 mm) wrench lets the arm slide in or out, changing the gap between the pole face and the tine. The factory window is “a gap between Pickup and Tine of between 1/16″ (1.588 mm) and 1/8″ (3.175 mm)” (fenderrhodes.com, Chapter Four). Gap is the level and dynamics control: “The smaller the gap between Tine and Pickup, the greater the volume of sound. More important — the more pronounced the DYNAMIC RESPONSE” (fenderrhodes.com, Chapter Four). Closer also brings out the bell and the bark; farther back yields a warmer, smoother, more subdued note (chicagoelectricpiano.com; soundgirls.org, The Fender Rhodes).
Two refinements bound the window. Closer than the nominal 1/16″ is possible on later pianos: “In Pianos built since March 1972, a gap of 0.020″ (0.508 mm) can be accommodated in the middle and upper ranges” (fenderrhodes.com, Chapter Four) — the post-March-1972 pickup (≈3″ long, vs. the earlier ≈3.5″) correlates with this tighter mid/treble allowance, though Chapter Four states the 0.020″ figure on its own and does not give the shorter pole as its cause; the closer gap yields more output and dynamics (jupitervintagepianos.com, Pickup (Rhodes)). Too close is a fault: if the gap is closed past clearance the swinging tine physically strikes the pickup, which reads as a buzz, clack, or choked note rather than added volume — the floor on the gap exists to keep the vibrating tine off the pole face.
Warn: Do not chase a quiet note by bending its tine toward the pickup — reset level at the pickup arm (¼″ Volume Adjustment Screw), exactly as Vol 05 §“Removing & replacing a tine” Step 6 prescribes. And do not close the gap below clearance to “get more volume”: past the floor the vibrating tine strikes the pole face and the note buzzes or chokes — that is mechanical contact, not output. Closer raises volume and dynamics only up to the strike limit (nominal 1/16″ / 1.588 mm; 0.020″ / 0.508 mm in the mid/upper of post-March-1972 pianos) (fenderrhodes.com, Chapter Four).
7.4 Setting it: eye then ear
The method is sequential — set every note visually first from a low angle, then make the final pass by ear, because the eye gets the scale close and repeatable and the ear resolves what the eye cannot. Steve’s Corner sets the whole keyboard this way in under an hour: visual first against reference notes, “straight down for the pickup volume settings, then … the final adjustment by ear,” and “afterward … set the pitch using a strobe tuner” (fenderrhodes.com/service, Ideal Tine Settings).
Tools: the #2 Phillips screwdriver (Timbre Adjustment Screw); the ¼″ (6.350 mm) wrench (Volume Adjustment Screw / pickup arm); a feeler or shim gauge to read the gap; a strobe tuner (Vol 08) for the pitch re-check; ears.
7.4.1 Step 1 — Establish reference settings
- On a known-good note near the top and one in the middle of the keyboard, confirm the tine end sits slightly above dead center of the pickup (Timbre Adjustment Screw, #2 Phillips) and the gap reads in the 1/16″–1/8″ (1.588–3.175 mm) window (Volume Adjustment Screw, ¼″ wrench) (fenderrhodes.com, Chapter Four; fenderrhodes.com/service).
- Use those two notes as the reference line the rest of the scale is matched to.
7.4.2 Step 2 — Set tine height visually, from a low angle
- With the eye near bench level — almost level with the tines — sight each tine against the pickup centerline and set it slightly above dead center with the Timbre Adjustment Screw. “The lower the viewing angle for the tone settings, the more accurate the setting” (paraphrasing fenderrhodes.com/service, Ideal Tine Settings).
- Compare each tine to the reference notes from Step 1 so the height is even across the scale, not set in isolation.
7.4.3 Step 3 — Set the gap visually, looking straight down
- Looking straight down over the pickup arm, slide the arm with the ¼″ Volume Adjustment Screw to bring the gap into the 1/16″–1/8″ (1.588–3.175 mm) window, verifying with the feeler gauge where a number is needed (fenderrhodes.com/service; fenderrhodes.com, Chapter Four).
- In the mid and upper range of a post-March-1972 piano, the gap may be closed toward 0.020″ (0.508 mm) for more output and dynamics — but never to the point the tine strikes the pole face (fenderrhodes.com, Chapter Four).
7.4.4 Step 4 — Finish by ear
- Play each note and its neighbors and refine height and gap by ear for an even bark and even level across the scale — the eye set the scale, the ear levels it (chicagoelectricpiano.com; fenderrhodes.com/service).
- Listen for the two common end-states and correct them: a dull/muddy note wants the tine lowered toward center (Timbre screw); a thin/weak note wants it raised slightly above center.
7.4.5 Step 5 — Re-establish pitch on the strobe
- After any tine has been bent, raised, or lowered, re-check pitch on the strobe — “when Timbre and Volume Adjustments are made, Pitch should be re-established” (fenderrhodes.com, Chapter Four).
- Hand the actual tempering of the keyboard (the tuning spring, equal vs. stretch, the strobe method) to Vol 08 §“Tuning & Tempering” — this step only confirms voicing did not pull a note off pitch.
Warn: Sight tine height from a low angle and the gap from straight down — not both from above. A tine that looks centered from straight overhead can be well off the pole-tip centerline when viewed from bench level, which is why the visual height pass is taken with the eye almost level with the tines (fenderrhodes.com/service, Ideal Tine Settings). And do not skip the strobe re-check: voicing by ear and trusting the result without verifying pitch is how a freshly voiced piano leaves the bench in tune-by-feel but flat on the meter.
7.5 Tip hardness × tine height × gap
The three voicing variables are independent levers on different parts of the tone, and the even, barking scale is the result of trading them off note by note. Hammer-tip hardness (Vol 06 §“Hammer tips”) sets the attack character — a soft tip gives a rounded “thunk” weighted to the fundamental, a hard tip a bright “clank” with stronger upper harmonics (fenderrhodes.com/service, Hammer Tips). Tine height sets the fundamental-to-overtone balance, and the gap sets level and dynamics. The table maps each lever’s direction to its tonal result.
Table 1 — Tip hardness × tine height × gap
| Variable (adjuster) | Setting | Tonal result |
|---|---|---|
| Hammer-tip hardness (Vol 06; durometer kit) | Soft | Rounded “thunk”, fundamental-weighted, mellow attack |
| Hard | Bright “clank”, stronger upper harmonics, articulate attack | |
| Tine height vs. centerline (Timbre Adjustment Screw, #2 Phillips) | Far above center | Dull / muddy — fundamental swamps the overtones |
| Slightly above center (target) | The bark — fundamental + tine/tonebar overtones both speak | |
| At / below center | Thin / weak — off-center, but the upward-biased swing barely crosses the pole | |
| Tine-to-pickup gap (Volume Adjustment Screw, ¼″ wrench) | Wide (toward 1/8″ / 3.175 mm) | Quieter, less dynamic, warmer / smoother |
| Close (toward 1/16″ / 1.588 mm; 0.020″ / 0.508 mm post-‘72 mid-upper) | Louder, more dynamic, more bark / bell | |
| Too close (past clearance) | Tine strikes pickup — buzz / clack / choke (fault, not volume) |
Note: The three levers overlap in what they affect, which is why they are voiced as a set. Brightness, for instance, can come from a harder tip, a tine biased toward center, or a closer gap — so a note that is too bright is corrected at whichever lever is furthest from its target, not by fighting all three. The usual diagnostic order is: confirm the tip is the right durometer for its zone (Vol 06), then set height for timbre, then gap for level — height before gap, because changing height slightly changes level but changing gap does not change timbre.
7.6 Even-scale voicing & era targets
The product of the three levers is an even scale — every note barking and sitting at a matched level against its neighbors, with the bass barking and the treble bell-like and articulate. Evenness is judged across reference notes (Cs and Fs up and down the keyboard, as in the Vol 06 strike-line pass) rather than note by note in isolation (fenderrhodes.com/service; vintagevibe.com, 5 Easy Ways to Make Your Rhodes Play Better). Three things must already be even before voicing can make the scale even: the grommets (Vol 05 — hardened grommets choke individual notes thin and nasal no matter how they are voiced), the escapement/blow distance (Vol 06 — graduated bass-to-treble), and the hammer-tip durometer zones (Vol 06).
Era voicing targets. The instrument’s voice shifted across the production run, and a refurbish can lean its voicing toward the era it is restoring or toward player taste:
- Earlier (Mark I, warmer) — softer/rounder attack and a slightly wider, warmer gap give the mellower, more fundamental-weighted voice associated with early pianos; earlier (pre-March-1972) pickups also hold the wider nominal gap (fenderrhodes.com, Chapter Four; chicagoelectricpiano.com).
- Later (brighter) — harder tips and a closer gap (down toward 0.020″ / 0.508 mm in the mid/upper of post-March-1972 pianos) give the brighter, more dynamic, bark-forward voice of later pianos (fenderrhodes.com, Chapter Four; jupitervintagepianos.com).
The two targets are reached with the same three adjusters described above — there is no separate “bright kit”; brightness is hard tips + tine toward (but never at) center + closer gap, and warmth is the opposite (chicagoelectricpiano.com; vintagevibe.com). All clearances remain inside the manual’s 1/16″–1/8″ (1.588–3.175 mm) window except the post-March-1972 mid/upper 0.020″ (0.508 mm) case (fenderrhodes.com, Chapter Four).
Warn: “Even” is the goal, not “as bright as possible.” Voicing every note to the closest gap and the most-centered tine chases the brightest tone but loses the dynamic range that is the bark — the bark lives in how much overtone the player can summon with touch, which needs headroom, not a maxed-out static setting (chicagoelectricpiano.com). Voice for an even, responsive scale; leave the dynamic range intact.
Sources
- fenderrhodes.com, Chapter Four: Dimensional Standards and Adjustments (Rhodes Keyboard Instruments factory service manual) — the load-bearing factory targets and every quoted instruction: Timbre Adjustment “until the end of the Tine rests on a plane slightly above dead center of the Pickup”; Volume Adjustment “slide Pickup Arms in or out to establish a gap between Pickup and Tine of between 1/16″ (1.588 mm) and 1/8″ (3.175 mm)”; “the smaller the gap between Tine and Pickup, the greater the volume of sound. More important — the more pronounced the DYNAMIC RESPONSE”; “In Pianos built since March 1972, a gap of 0.020″ (0.5080 mm) can be accommodated in the middle and upper ranges”; and “when Timbre and Volume Adjustments are made, Pitch should be re-established.” (The same source supplies the coarse-alignment quotes carried in Vol 05 §“Removing & replacing a tine” Step 6.)
- fenderrhodes.com/service, Steve’s Corner — Ideal Tine Settings — the eye-then-ear method: visual first against top and middle reference notes (“comparing the bottom of the tine to the top reference line”), “the lower [the] viewing angle for the tone settings, the more accurate the setting,” look “straight down for the pickup volume settings, then … the final adjustment by ear,” and “afterward … set the pitch using a strobe tuner.” Steve’s end-of-tine-to-pole-tip gaps are quoted as “1/16″ for the wood tips, 1/32″ for the mid-range notes and 1/16″ for the bass notes” (i.e. 1/16″ = 1.588 mm, 1/32″ = 0.794 mm) — the same horizontal tine-end-to-pole-tip gap Ch.4 specifies, read zone by zone. The only difference from Ch.4’s general 1/16″–1/8″ (1.588–3.175 mm) window is a value choice: Steve runs the mids tighter (1/32″ ≈ 0.794 mm), which sits inside Ch.4’s own post-March-1972 mid/upper allowance of 0.020″ (0.508 mm) — i.e. the zone-specific tightening Ch.4 sanctions, not a different geometry (fenderrhodes.com/service; fenderrhodes.com, Chapter Four).
- chicagoelectricpiano.com, The Fender Rhodes “Bark” — the bark as “the signature tone of the Rhodes,” “produced by the overtones generated by the Rhodes’ tine and tone bar when proper escapement and pickup distance is set to capture these overtones within their magnetic fields,” and the point that “the dynamic range of the bark can be set such that the player can bring out more or less bark with more or less forte” — i.e. the bark lives in dynamic response, reached only when action and voice are set at ideal levels.
- vintagevibe.com, 5 Easy Ways to Make Your Rhodes Play Better — voicing as adjusting each note’s level and tonal quality across the scale; even-scale judging against reference notes; level reset at the pickup arm, not the tine (carried from Vol 05).
- jupitervintagepianos.com, Pickup (Rhodes) — the pickup adjusted in/out by a 1/4″ nut driver as a voicing/level control; closer = brighter and more harmonically rich, farther = warmer and smoother; post-1972 pickups ≈3″ long vs. ≈3.5″ earlier, correlating with the post-March-1972 closer-gap allowance.
- soundgirls.org, The Fender Rhodes, and mat.ucsb.edu, Shear (UCSB thesis) — the pickup physics behind tine height: symmetric (dead-center) swing doubles the output toward the octave; off-center bias restores the fundamental; vertical position sets waveform symmetry and harmonic content (carried from Vol 02 §“The electromagnetic pickup”).
- Cross-references: the asymmetric tine/tonebar fork and the pickup physics (tine position → harmonic content, gap → level) are Vol 02 (Theory of Operation & Signal Path); the tone generator, grommets, coarse tonebar alignment, and the coarse Timbre/ Volume-screw settings these refine are Vol 05 (Tines, Tonebars & Grommets); hammer tips, escapement/blow distance, and the regulated action voicing assumes are Vol 06 (Action Regulation); and retuning the keyboard after voicing (the tuning spring, equal vs. stretch, the strobe method) is Vol 08 (Tuning & Tempering).
Flagged as conflicting, field-sourced, or unverified — not invented: (1) the gap dimensions — Chapter Four and Steve’s Corner describe the same horizontal tine-end-to-pole-tip gap, not two different geometries. Chapter Four gives the general 1/16″–1/8″ (1.588–3.175 mm) window plus a 0.020″ (0.508 mm) post-March-1972 mid/upper allowance; Steve’s Corner gives zone-specific values within that gap — 1/16″ (1.588 mm) bass / 1/32″ (0.794 mm) mid / 1/16″ (1.588 mm) wood-tip. The only divergence is a value choice (Steve’s tighter ~1/32″ mids), which falls between Ch.4’s 1/16″ floor and its 0.020″ post-‘72 mid/upper allowance — the zone-specific tightening Ch.4 sanctions, stated rather than averaged. (2) The end-state descriptors (too high = dull/muddy, dead-center = thin/hollow, at-or-below = thin/weak) — the direction (slightly above dead center is the target) is quoted from Chapter Four, the symmetry physics of dead center from Shear/soundgirls, and the above/below asymmetry follows from the hammer striking the tine from below (Vol 02); the specific adjectives are the field convention and are marked (est.). (3) Era voicing targets (warmer-early vs. brighter-later) are stated qualitatively from the bark and pickup-history sources, not as numeric per-era settings — the only era-specific number is the post-March-1972 0.020″ gap from Chapter Four. No clearance, gap, or durometer value has been invented; every numeric target is quoted from Chapter Four or Steve’s Corner and given in fractional inch and millimetre.
Comments (0)