Fender Rhodes Stage 88 · Volume 5
Fender Rhodes Stage 88 — Vol 05: The Tone Generator — Tines, Tonebars & Grommets
This is the tone-generator volume of the refurbishment bench manual. With the harp off the piano and resting tines-up on the bench (Vol 03 §“Harp removal & action access”), the work here is on the part that actually makes the note: the tine/tonebar fork, the rubber grommets that isolate each tonebar, the screws, washers and springs that mount it, and the pickup the tine is aimed at. Three procedures live in this volume — replacing a broken or fatigued tine (service-manual Chapter Six), renewing the tonebar grommets and screws, and setting coarse tonebar alignment so the tine sits square in front of its pickup. Two refinements are deliberately deferred: the fine voicing-by-ear (tine height vs. the pole tip, the gap that sets level) is Vol 07, and retuning the whole keyboard after parts work is Vol 08. This volume sets the mechanical foundation those two passes refine.
Note: The theory this volume builds on is Vol 02. There, each note was shown to be an asymmetric tuning fork: a thin springy tine (the lower leg the hammer strikes, which carries the pitch) coupled at a common base to a heavy formed tonebar (the upper leg that “stores energy from the initial hammer and helps to sustain the vibrations in the tine”), the whole fork mounted to the tonebar rail on rubber grommets and sensed by an electromagnetic pickup at the tine’s free tip (fenderrhodes.com, Chapter One; Vol 02 §“The asymmetric tuning fork”). This volume is the bench counterpart to that theory — the same fork, taken apart and rebuilt.
5.1 The tone generator at the bench
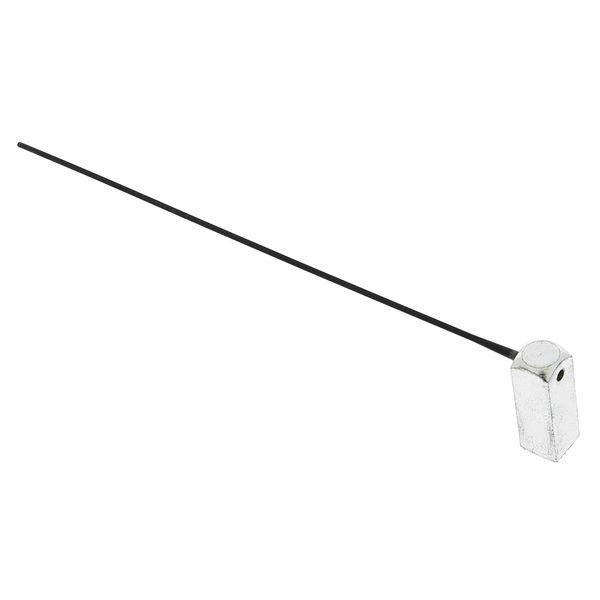
A single tone generator (the manual’s term) is one complete fork as it mounts to the harp: a tonebar, the tine clamped to the tonebar’s base by a single, factory power-torqued screw, the tuning spring wound on the tine, and the two screw/washer/grommet/spring stacks that fasten the assembly to the tonebar rail. Eighty-eight of them sit in a row on the harp, each aimed at its own pickup on the pickup rail (Vol 02 §“The passive harp & wiring”).
The geometry the three procedures below all turn on is drawn first. There are two different screws on one tone generator, and the volume keeps them apart. The two mounting screws (#2 Phillips) each run through a washer, rubber grommet and spring into the tonebar rail — the grommet sitting in the load path between the tonebar foot and the rail (the foot resting on the grommet, the grommet on the rail). These hold the bar down and, by how far they are run in against the grommets, set the bar’s height and aim. A separate 5/16″ screw, factory power-torqued for metal-to-metal contact, clamps the tine to the tonebar — that one is broken loose in a bench vise (§“Removing & replacing a tine”), never with the mounting screws.
5.1.1 Tone-generator assembly — labeled cross-section
Tip: Three things are adjusted by parts on this one drawing, and the volume keeps them strictly separate so they are not confused on the bench: pitch is the tine (its cut length, trimmed by the tuning spring — Vol 08); sustain and timbre body are the tonebar and its grommets; and output level and harmonic voicing are the tine-to-pickup geometry (Vol 07). A fault in a note almost always traces to exactly one of the three.
5.2 Removing & replacing a tine
Tines are a fatigue item, not a permanent fixture — the factory reported tines surviving “in excess of 6,000,000 blows in a test machine,” but real tines do break, most often at the base where bending stress concentrates (fenderrhodes.com, Chapter One; Vol 02 §“Pitch is set by tine length”). A dead, buzzing, or mechanically rattling single note is therefore treated as a fork fault here, not an electrical one. The procedure below follows the service manual’s Chapter Six tine-replacement sequence (twelve steps), condensed and annotated for the bench.
Tools: #2 Phillips screwdriver (the two tonebar mounting screws, and the Timbre Adjustment Screw at refit); a pair of sharp side cutters (flush); a ¼″ (6.350 mm) wrench (the Volume Adjustment Screw on the pickup arm); a 5/16″ (7.938 mm) wrench (the factory power-torqued tine clamp screw — the manual’s “Tone Generator Mounting Screw”; a ratchet wrench helps); a bench vise with soft jaws; the correct replacement tine (sized per §“Sourcing tines”); a tuning spring if the original is lost; the cutting chart, Figure 6-2 that ships with the tine kit (fenderrhodes.com, Chapter Six).
5.2.1 Step 1 — Expose and identify the failed tone generator
- With the harp on the bench tines-up (Vol 03 §“Handling & storing parts”), locate the tone generator carrying the broken or faulty tine.
- Confirm the fault is the tine, not the tonebar, grommet, or pickup — a buzzing note can equally be a hardened grommet (§“Tonebar grommets & screws”) or a misaligned pickup (Vol 07). A snapped or cracked tine is unambiguous.
Note: All tines “are of the same configuration and vary only in length” (fenderrhodes.com, Chapter Six) — which is exactly why a blank can be cut to any note. What differs between suppliers is the taper (§“Sourcing tines”), and that must match the era of the piano.
5.2.2 Step 2 — Remove the tone generator from the harp (no vise — screwdriver work)
Getting the whole fork off the rail is gentle screwdriver work, not a wrenching job. Each tone generator is held to the tonebar rail by two #2 Phillips mounting screws, and each of those runs through a washer, a rubber grommet and a spring (§“The tone generator at the bench”). Backing them out is all that frees the assembly — the vise is not used here.
- With the harp standing on its edge for access (fenderrhodes.com, Chapter Six), back out both #2 Phillips mounting screws that secure the complete tone-bar assembly to the tonebar rail.
- Lift the assembly free, capturing each screw, washer, grommet and mounting spring in order as they come off (these are renewed in §“Tonebar grommets & screws”).
Warn: These mounting screws pass through a rubber grommet and spring — set and removed gently with the screwdriver. Do not power-drive or over-torque them on reassembly: crushing the grommet chokes the very sustain it is there to allow (see the over-tighten Warn under §“Mounting & coarse alignment”). The power-torque-and-vise method below is for a different screw — the tine clamp.
5.2.3 Step 3 — Replace the tine (the vise step — the power-torqued screw)
Only now does the vise come out, and for one screw: the tine clamp screw (the manual’s “Tone Generator Mounting Screw”), which holds the tine to the tonebar in a rigid metal-to-metal joint and is factory power-torqued — “since absolute contact between the tone generator and the tone bar is necessary, this screw is installed at the factory with power equipment and in some cases removal seems almost impossible” (fenderrhodes.com, Chapter Six). Driven that tight, it cannot be broken loose by hand without bending or twisting the slender fork.
- Set the tone generator between the jaws of a bench vise and tighten the jaws securely (soft jaws or jaw pads protect the tonebar finish) (fenderrhodes.com, Chapter Six).
- With the 5/16″ (7.938 mm) wrench — a ratchet wrench gives the best control — loosen and remove the tine clamp screw, and lift off the remains of the old tine from the tonebar base.
- Fit the new tine (or blank) to the tonebar base, transferring the tuning spring onto it (every tine carries one — Vol 02 §“Pitch is set by tine length”).
- Re-install and tighten the tine clamp screw firmly with the 5/16″ wrench, the assembly still in the vise — “secure the new replacement by installing and tightening the Tone Generator Mounting Screw” (fenderrhodes.com, Chapter Six). This metal-to-metal joint must be re-torqued tight: an under-tightened tine clamp gives a dead, dull or buzzy note.
Warn: Do not try to break the power-torqued tine clamp screw loose with the assembly held in the hand or still on the harp. The factory torque is high enough that wrenching it unsupported bends or twists the tonebar/tine assembly — a ruined part and a far bigger job than the broken tine. Clamp the tone generator in the vise first, every time (fenderrhodes.com, Chapter Six). This is the most common avoidable damage in a tine replacement. (The two grommet mounting screws of Step 2 are the opposite case — gentle, never power-torqued.)
5.2.4 Step 4 — Cut the new tine to length against the chart
- Cut the new tine to length with the sharp side cutters, using the cutting chart (Figure 6-2) as the reference for that note (fenderrhodes.com, Chapter Six). “The tines can easily be cut to size by means of a pair of side cutter pliers,” and the chart gives the correct length per key for the era of the piano.
- Cut slightly long on the first pass — length can be trimmed down toward pitch, but a tine cut too short is scrap.
Warn: Use the cutting chart, and cut long first. The pre-cut/chart length is a starting estimate, not the final pitch — final pitch is reached by the tuning spring and by trimming (Step 5, Vol 08). A tine cut to the chart and then found short cannot be lengthened; it is wasted. Measure against the chart, cut proud, then bring it down.
5.2.5 Step 5 — Tune the new tine (coarse — full tuning is Vol 08)
The manual sets coarse pitch right at the bench by ear against the neighboring octave, then refines it with the tuning spring:
- With the left hand, pluck the tine an octave below the replacement assembly.
- With the right hand, pluck the replacement tine and slide the tuning spring until pitch alignment is accomplished (fenderrhodes.com, Chapter Six) — the spring “acts as a counter-weight and, therefore, as a pitch control” (Vol 02 §“Pitch is set by tine length”).
- If the tine is still flat of target with the spring at its travel limit, trim a little more length (Step 4) and re-check — trimming shortens the tine, which raises its pitch. Only ever trim a flat tine; trimming a sharp one drives it further sharp and cannot be undone.
Note: This is coarse tuning only — getting the new note into the right ballpark against its octave so the assembly can go back on the harp. Tempering the whole keyboard to A=440 (equal vs. stretch), which springs reach which notes, and the strobe method are the subject of Vol 08; this step exists only so the replacement is musically close before reassembly. The tine-base detail and the spring-as-vernier principle are Vol 02 §“Pitch is set by tine length.”
5.2.6 Step 6 — Refit the assembly and reset volume & timbre after
Reinstalling the tone generator moves the tine relative to its pickup, so the note’s output level must be reset — and the manual does this by sliding the pickup arm, not by touching the tine:
- Refit the tone generator to the harp with its two mounting screws, washers, grommets and springs (renew them per §“Tonebar grommets & screws” if hardened), and run the two #2 Phillips mounting screws back down gently — through the grommets/springs — to set coarse bar height and aim, not power-driven (§“Mounting & coarse alignment”).
- Reset volume by loosening the Volume Adjustment Screw with the ¼″ (6.350 mm) wrench and sliding the pickup arm in or out as the note is played until the new note matches its neighbors for level (fenderrhodes.com, Chapter Six).
- Reset timbre by rotating the Timbre Adjustment Screw with the #2 Phillips screwdriver as the note is played — the manual sets it “until the end of the Tine rests on a plane slightly above dead center of the Pickup” (fenderrhodes.com, Chapter Six). That is the coarse setting of the tine-height-vs-pickup-centerline relationship; the fine, by-ear version — tine height vs. the pole tip for harmonic content — is Vol 07.
Warn: Reset the replaced note’s level at the pickup arm (¼″ Volume Adjustment Screw) — not by bending the new tine toward the pickup. Bending the tine to chase loudness changes its rest geometry and corrupts the Vol 07 voicing reference; the manual’s adjustment is the pickup arm slide, which moves the sensor to the tine, leaving the tine where it was cut and tuned (fenderrhodes.com, Chapter Six).
Note: The manual notes that factory-era replacement tines were “packaged in kits of six,” each kit including an assortment of tuning springs and a cutting chart (fenderrhodes.com, Chapter Six). The modern restoration trade sells them individually instead, with springs separate — see §“Sourcing tines.”
5.3 Sourcing tines (tapers & positions)
A replacement tine has to match the piano, and the variable that matters is the taper — the profile ground or swaged into the rod. Several suppliers made Rhodes tines over the production run, each with a different taper and therefore a different optimal strike point, so “the tine in your piano needs to match the era of your instrument or you’ll end up fighting sustain and tone problems” (vintagevibe.com, Fender Rhodes Tines; fenderrhodesla.com, Rhodes Piano Tines by Year).
Positions and ordering (Vintage Vibe). Vintage Vibe sells Rhodes tines by a position index running #0 through #73 (roughly E1 at the bottom to E7 at the top), sold individually rather than in the factory’s kits-of-six. This #0–#73 index is a tine-numbering convention, not a count of all 88 keys — it spans the harp by position; the specific tine for a given note on an 88 is pinned down not by this index alone but by note name + tine number + model (below). Tuning springs are sold separately (“Tuning spring not included”). Both a pre-cut option and a default-length blank are offered, but the pre-cut length is a rough estimate — final pitch is still reached by the tuning spring and trimming (§“Removing & replacing a tine,” Steps 4–5). Ordering correctly requires specifying the exact note name, the tine number, and the model of piano (vintagevibe.com, Fender Rhodes Tines). Vintage Vibe’s own tines are made to Torrington specifications, “using some of the exact same equipment used by Torrington.”
5.3.1 Tine taper types by era and character
Table 1 — Tine taper types by era and character
| Taper / supplier | Era (approx.) | Taper profile | Character & notes |
|---|---|---|---|
| Raymac | 1960s, pre-1971 | Gradual taper, made by a center-less grind technique | The earliest tines; longer, gradual taper. Match only to early pianos — a Raymac strike point differs from later tines (vintagevibe.com; retrolinear.com). |
| Torrington | ~1971–1976 | Shorter taper, made by swaging | The most common Rhodes tine, and the modern reference: Vintage Vibe replicates the Torrington spec on the same equipment. The taper most replacement stock is cut to (vintagevibe.com). |
| Schaller | ~1977–end of production | Shorter and steeper taper than the rest | Widely regarded as the worst-sustaining of the OEM tapers; the steep taper changes the strike-point match. Common on late Mark I and Mark II-era pianos by year (vintagevibe.com; retrolinear.com). |
| Singer (for completeness) | ~1976–1977 | Between Torrington and Schaller | A short-run supplier between the Torrington and Schaller periods; noted here only so a piano of that era is not mis-matched to Torrington or Schaller stock (retrolinear.com). |
Warn: Do not order tines by note alone and assume one taper fits the whole production run. A piece cut on the wrong taper has the wrong optimal strike point for that piano’s hammer line, and the note “fights sustain and tone” no matter how carefully it is tuned and voiced (vintagevibe.com; fenderrhodesla.com). Match the taper to the era, and specify note name + tine number + model when ordering.
Note: Two specifics that this volume deliberately does not state as fact are the tine wire gauge / diameter and a plain per-note length table (both carried in the consolidated unverified-items note at the end of this volume). Neither was confirmable from the consulted sources: Vintage Vibe’s tine page lists no gauge or diameter, and the figures live inside the cutting-chart PDF, which is published as a scanned image rather than machine-readable text. Those numbers should be read off the actual cutting chart on the bench, not taken from here — no gauge or per-note length is invented in this volume (vintagevibe.com, Fender Rhodes Tines; fenderrhodes.com, tine-cutting-chart.pdf).

5.4 Tonebar grommets & screws
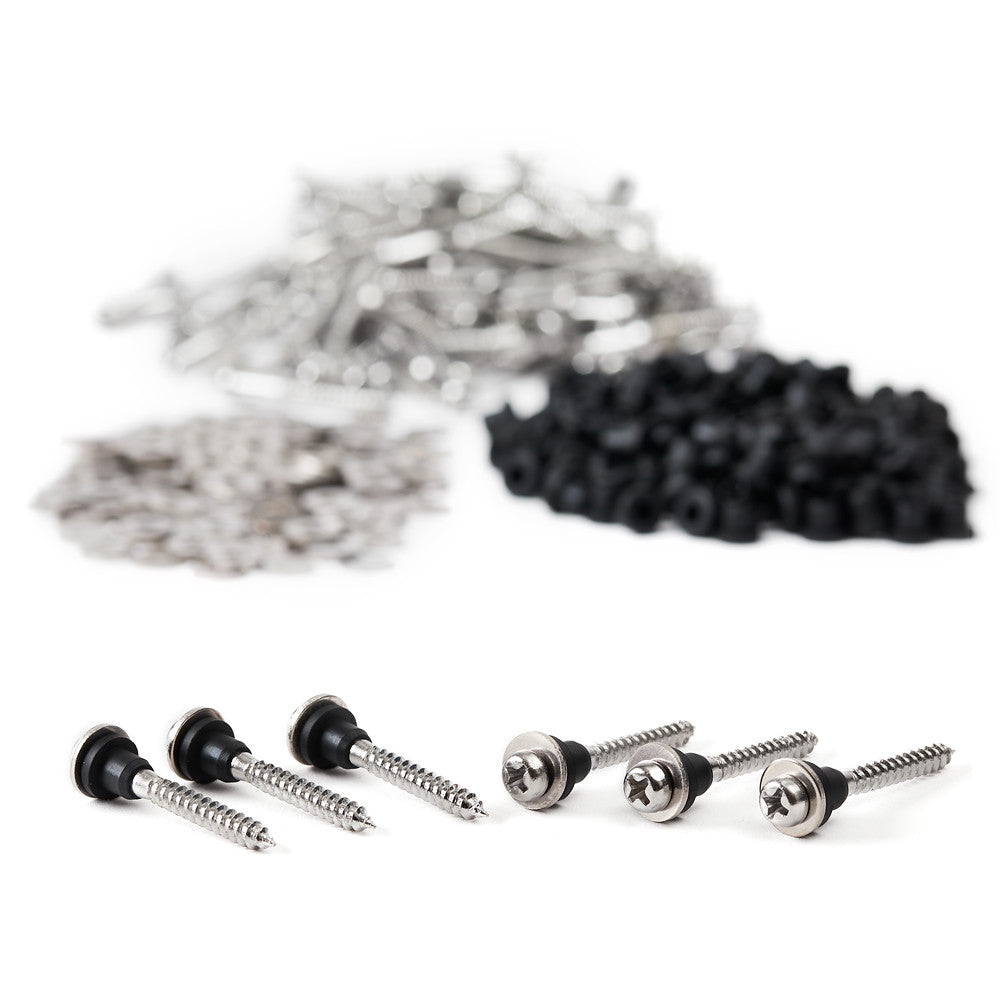
The grommets are, in Vintage Vibe’s words, the heart of the Rhodes’ sustain: “Grommets are at the heart of vibration and sustain of the tine and tone bar.” When a grommet is original — old, shrunken and hardened — or simply the wrong density, it “loses its natural ability to allow vibrations of the tine, and it starts to choke out the vibrations, resulting in a short ring time and/or a dull tone.” The audible signature of bad grommets is thin, nasal, short notes and a tonebar that sways sloppily on its mount instead of sitting stable. Renewing them is “paramount to voicing and achieving the proper sustain and tone of your Rhodes piano” (vintagevibe.com, Tone Bar Screws and Grommet Kit; Why Tone Bar Screws, Washers and Grommets Are Important).
Tools/consumables: the correct screw + washer + grommet kit (73- or 88-note quantity); #2 Phillips; the ¼″ / 5/16″ wrenches as needed; the mounting springs (re-used, or replaced if corroded).
5.4.1 Step 1 — Diagnose the grommets
- Press or rock each tonebar gently — a tonebar that sways loosely on its mount, or a note that rings short, thin or nasal with no tine or pickup fault, points at a hardened or wrong-density grommet choking the bar (vintagevibe.com).
- Inspect the grommets for the classic failure: shrunken, hard, cracked rubber that no longer cushions the bar.
5.4.2 Step 2 — Replace as a matched screw + washer + grommet stack
- With the tone generator removed (§“Removing & replacing a tine,” Step 2), pull the old grommet, washer and screw and fit the matched replacement set. Vintage Vibe manufactures the nickel/chrome-plated screws and the Rhodes-style grommets as a pair, to the tightest tolerance available, because the screw and grommet must fit each other precisely (vintagevibe.com).
- Confirm each screw is dead straight — “slightly bent screws cause voicing nightmares,” especially in the treble, because a bent screw cannot hold the bar’s aim true (vintagevibe.com).
- Reassemble the stack in order, from the screw head down to the rail — screw → washer → tonebar foot → grommet → mounting spring → rail — so the foot rests on the grommet and the grommet on the rail, with the spring holding the bar in tension just off the rail (see §“The tone generator at the bench” SVG). Each tone generator takes two such stacks.
Warn: Do not fit cheap, off-spec, or wrong-density grommets, and do not reuse a bent screw. A wrong-density grommet chokes the bar exactly as a hardened original does (thin, short, nasal notes), and a bent screw makes the tonebar impossible to aim and voice — both defeat the entire voicing pass (Vol 07). Use a matched screw+washer+grommet kit with straight screws (vintagevibe.com).
Note: The grommet’s exact durometer (rubber hardness) and material compound are not published by the vendor in figures (this item is carried in the consolidated unverified-items note at the end of the volume); the sources describe the right grommet qualitatively — it must “flex or pop” when the bar is struck and must not be so hard that it chokes the bar, nor so soft it fails to position it. No numeric hardness is invented (vintagevibe.com, Why Tone Bar Screws, Washers and Grommets Are Important). The screw count is settled: each tonebar carries two #2 Phillips mounting screws, each with its own washer, grommet and spring (jupitervintagepianos.com, Tone Bar Screw; shadetreekeys.com, Tines and Tone Bars — “each tone bar and tine is mounted to the plywood tone bar rail by two long screws”).
5.5 Mounting & coarse alignment
With fresh grommets and a tuned tine, the tone generator goes back on the harp — and the two mounting screws through the springs and grommets do double duty: they clamp the bar down and, by how the bar sits once tightened, aim the tine at its pickup. “The proper screw and grommet combination also ensures the stability and positioning of your tone bar,” maintaining correct alignment with the pickup (vintagevibe.com, Why Tone Bar Screws…). The job here is coarse alignment; the fine work is handed off.
Tools: #2 Phillips (the two tonebar mounting screws).
5.5.1 Step 1 — Seat and aim the tonebar (coarse)
- Fit the tone generator with its renewed screw/washer/grommet/spring stacks and run the two #2 Phillips mounting screws down — gently, by hand — until the bar is stable on its grommets (no sway) but not crushed flat.
- With the bar seated, sight the tine across the keyboard so it sits square and centered in front of its pickup, level with its neighbors — this is the coarse aim. The bar’s height and lateral aim are set by how the mounting screws are run in against the grommets.
5.5.2 Step 2 — Hand off the fine work
- Fine voicing — by ear, at the pickup. The exact tine height vs. the pole tip (which sets harmonic content) and the tine-to-pickup gap (which sets level) are the voicing pass of Vol 07 — set the tine square here, voice it there.
- Retuning — the whole keyboard. Cutting and refitting tines pulls the keyboard’s tuning; tempering it back to pitch (equal vs. stretch, the tuning spring, the strobe method) is Vol 08.
Note: Coarse alignment, fine voicing, and tuning are kept as three separate passes on purpose. Setting the tine square and centered in front of the pickup at the bench (here) gives Vol 07 a clean, repeatable starting point for the height/gap voicing, and Vol 08 a stable mechanical fork to temper. Doing all three at once — chasing pitch, level, and timbre on a swaying bar — is how a refurbish goes in circles. Mount and aim coarse; voice by ear in Vol 07; retune in Vol 08.
Warn: Do not over-tighten the mounting screws to “kill” a sway — a tonebar bolted down hard onto a good grommet chokes the very sustain the grommet is there to allow (the same fault as a hardened grommet). Tighten only until the bar is stable, letting the grommet do its cushioning job (vintagevibe.com).
Sources
- fenderrhodes.com, Chapter Six: Repair Procedures and Techniques (Rhodes Keyboard Instruments factory service manual) — the twelve-step tine-replacement procedure and every quoted instruction: tools (#2 Phillips, side cutters, ¼″ (6.350 mm) and 5/16″ (7.938 mm) wrenches); all tines “of the same configuration and vary only in length”; tines “easily cut to size by means of a pair of side cutter pliers”; the two-screw distinction — first “remove both Screws mounting the complete Tone Bar Assembly to the Tone Bar Rail,” then the bench-vise step for the factory power-torqued Tone Generator Mounting Screw (the tine clamp; “since absolute contact between the tone generator and the tone bar is necessary, this screw is installed at the factory with power equipment”): “Set tone generator between jaws of a bench vise and tighten jaws securely,” loosen with a “5/16″ ratchet wrench”; re-secure the new tine by “installing and tightening the Tone Generator Mounting Screw”; cut the new tine to length per the cutting chart (Figure 6-2); coarse-tune by plucking the tine an octave below with the left hand and the replacement with the right while sliding the tuning spring to pitch; reset volume by loosening the Volume Adjustment Screw with the ¼″ wrench and sliding the pickup arm; reset timbre by rotating the Timbre Adjustment Screw with the #2 Phillips “until the end of the Tine rests on a plane slightly above dead center of the Pickup”; factory replacement tines “packaged in kits of six” with tuning springs and a cutting chart.
- fenderrhodes.com, Chapter One: The Rhodes Tone Source — the tine as a fatigue item surviving “>6,000,000 blows” yet breaking at the base; the tuning spring as a counter-weight pitch control (carried from Vol 02).
- fenderrhodes.com, tine-cutting-chart.pdf — the per-note tine-length chart (Figure 6-2 equivalent). Published as a scanned image, so per-note lengths and any wire gauge were not machine-extractable and are not reproduced or invented here; read them off the chart on the bench.
- vintagevibe.com, Fender Rhodes Tines (product + FAQ) — tine positions #0–#73 (~E1–E7), sold individually, tuning springs separate (“not included”), pre-cut length a rough estimate, ordering requires note name + tine number + model; the three tapers — Raymac (1960s, center-less grind, gradual taper), Torrington (most common, swaged, shorter taper), Schaller (shorter and steeper); Vintage Vibe tines made to Torrington spec on Torrington’s own equipment. No wire gauge / diameter is published — flagged unverified.
- vintagevibe.com, Fender Rhodes Tone Bar Screws and Grommet Kit and Why Tone Bar Screws, Washers and Grommets Are Important to a Fender Rhodes Piano — grommets as “the heart of vibration and sustain”; hardened/shrunken grommets “choke out the vibrations” → short ring time, dull/thin/nasal tone; replacement “paramount to voicing”; screws and grommets manufactured as a matched pair to tight tolerance; screws must be dead straight (“slightly bent screws cause voicing nightmares”); the screw+grommet combination ensures the stability and positioning of the tone bar and its alignment with the pickup. Grommet durometer/material is described qualitatively only — flagged vendor-sourced/unverified.
- vintagevibe.com, Fender Rhodes Tine Spring — tuning springs sold separately.
- jupitervintagepianos.com, Tone Bar Screw / Tone Bar Assembly, and shadetreekeys.com, Tines and Tone Bars — each tone generator is held to the tonebar rail by two mounting screws (“two screws in each tone bar assembly”; “each tone bar and tine is mounted to the plywood tone bar rail by two long screws”), each through a washer, grommet and spring; the screws are Phillips head; the spring “suspends the bar just under a half inch from the rail.”
- retrolinear.com, MK.I Torrington Tines, MK.I & MK.II Schaller Tines, MK.I Raymac/Singer Tines, and fenderrhodesla.com, Rhodes Piano Tines by Year: A Simple Guide — the era-by-supplier timeline (Raymac pre-1971 → Torrington ~1971–76 → Singer ~1976–77 → Schaller ~1977–end), each taper’s distinct optimal strike point, and the caution that a tine “needs to match the era of your instrument or you’ll end up fighting sustain and tone problems.”
- Cross-references: the asymmetric tine/tonebar fork, the grommet mount, the pickup, and why a single fork fault is one audible note are Vol 02 (Theory of Operation & Signal Path); getting the harp off the piano and storing it tines-up is Vol 03 (Tools, Bench Setup & Teardown); the fine voicing by ear — tine height vs. the pole tip and the tine-to-pickup gap — is Vol 07 (Voicing & Tone); and retuning the keyboard (the tuning spring, equal vs. stretch, the strobe method) is Vol 08 (Tuning & Tempering).
Flagged as unverified or vendor-sourced, not invented: (1) the tine wire gauge / diameter — not published on the VV tine page; (2) a plain per-note tine length table — lives only in the image-scanned cutting-chart PDF and must be read off the chart; (3) the grommet durometer / material compound — described only qualitatively by the vendor; (4) Mark I vs. Mark II tine/tonebar/grommet spec differences — none were found in the sources; the meaningful difference across the run is the tine supplier/taper by year (era), not the Mark designation, so no Mark I/II part-spec split is asserted here. (The per-tonebar screw count is no longer on this list — it is confirmed as two mounting screws, per jupitervintagepianos.com and shadetreekeys.com.) No wrench size, length, gauge, durometer, or torque value has been invented; named wrench/screw sizes (#2 Phillips, ¼″/6.350 mm, 5/16″/7.938 mm) are quoted from Chapter Six.
Comments (0)