Building Organ Pipes · Volume 3
Building Organ Pipes — Vol 03: The Stopped (Gedeckt) Flute — the First Pipe
Vol 01 laid out the pipe families a crank organ needs and why a builder learns to voice by making, not buying. Vol 02 selected the wood, sharpened the tools, and built the jigs — the shooting board that squares an edge, the glue-up caul that holds a thin box true, the U-tube manometer that reads wind at the bench. This volume spends all of that preparation on a single object: the first pipe a builder should ever cut, the stopped (gedeckt) wooden flute. It is a complete, ordered build — anatomy, boards, glue-up, mouth, stopper, first speech, and tuning — worked at the concrete dimensions the hobby literature actually gives.
The stopped flute earns its place at the front of the queue on three counts, all of them practical. First, it produces a given pitch from about half the wood an open pipe of the same pitch would need — a stopped pipe closed at the top sounds roughly one octave lower than an open pipe of the same speaking length, so to reach a wanted pitch the stopped pipe is cut to about half the length of the open pipe that would sound it. Less board, less bench time, a shorter box to keep square. Second, it is the quietest and roundest of the flue voices — it speaks on odd harmonics only, giving a hollow, flute-like tone with little of the brightness that makes a badly-voiced open or string pipe scream. Third, and most important for a beginner, it is the most forgiving to voice: the mouth tolerances are gentler, the pipe tunes over a wide range simply by sliding its stopper, and a first attempt that speaks a little sharp or flat is corrected with a push of the thumb rather than a fresh cut.
Where the physics lives. Why a closed tube sounds an octave below an open tube of the same length, why the closed end forces odd harmonics and a half-wavelength resonance, and where the ~0.61·radius end correction comes from, all belong to the sibling dive “How Organ Pipes Make Sound” (see its Vol 03, Open vs Stopped). This volume states those relationships exactly and uses them; it does not re-derive them. Wind pressure is context only: these pipes are voiced at the small-organ standard of ~5 in H₂O (127 mm ≈ 1.245 kPa) — see the Wind Systems dive.
Units and sourcing. Dimensions are given in millimetres and centimetres (the hobby pages are metric), with inches where a source is imperial. Craft facts drawn from a specific page are cited inline: (en_pijp) for
hobbycrankorgan.com/subdir/en_pijp.htm(the community “how to make an organ pipe”), (jsart26) for Tony Goldsworthy’s pipe-making tips and (jsart42) for Bruce Thompson’s traditional-pipe article onmelright.com/busker, and (OHS works18) for the Organ Historical Society’s flue-pipe anatomy. Anything the sources do not pin down is marked (est.) and never invented.
3.1 Why the stopped flute is the right first build
3.1.1 Same pitch, half the length
A pipe open at both ends and a pipe closed at one end obey different resonance rules. Stated in the exact terms the sibling dives use: for the same speaking length, a stopped pipe sounds about one octave lower than an open pipe; turned around, to reach the same pitch, a stopped pipe is cut to about half the length of the open pipe. The idealized relations are open f₁ ≈ c/2L and stopped f₁ ≈ c/4L — quoted here only to fix the vocabulary; the derivation is in How Organ Pipes Make Sound, Vol 03.
For a first pipe this halving is pure gift. A middle-of-the-scale note that would want an open box on the order of 300–340 mm of speaking length is reached with a stopped box of roughly 150–170 mm (est. for this worked example; the exact cut follows from the target pitch and is tuned, not calculated to the millimetre — §8). Half the length is half the board to plane true, a shorter run of glue line to keep airtight, and a stiffer, less warp-prone box.
3.1.2 Odd harmonics, quiet and round
Because one end is closed, the stopped pipe resonates on a quarter-wavelength at its fundamental and reinforces odd harmonics only (fundamental, 3rd, 5th, …). The even harmonics that give an open pipe its brightness are largely absent. The audible result is the classic gedeckt: round, hollow, flute-like, and noticeably quieter than an open or string pipe of the same pitch. For a busker organ the stopped rank is the tonal backbone — a bed of soft, fundamental-heavy tone over which the brighter open and string ranks sit — and its quietness is a mercy in a workshop where a first pipe will be blown many times before it is right.
3.1.3 Forgiving to voice and to tune
The open pipe is tuned by its physical top — cut it, slide it, flap it — so an error in length is an error in pitch that must be cut out. The stopped pipe is tuned by a movable stopper in the top of the box (§8): sliding the stopper in shortens the effective air column and raises the pitch; sliding it out lengthens the column and lowers the pitch. A first pipe cut a little long simply tunes down with the stopper pushed in; a pipe cut a little short can often still be pulled to pitch with the stopper drawn out to the lip of the box. That single degree of freedom — a leather-padded plug that slides — is what makes the gedeckt the beginner’s pipe.
Figure 1 — Same pitch, different length. A stopped (gedeckt) pipe reaches a given pitch from about half the speaking length of the open pipe that would sound it, because a closed tube sounds roughly one octave lower than an open tube of equal length and resonates on odd harmonics only. The physics is in “How Organ Pipes Make Sound, Vol 03.”
3.2 Anatomy of a wooden stopped pipe
Before cutting anything, a builder needs the parts by name, because every instruction that follows names them. A wooden stopped flue pipe is a square- section box made of flat boards, plugged near the bottom by a block, with a mouth cut into the front and a sliding stopper closing the top. The terms below follow the Organ Historical Society’s flue-pipe anatomy (OHS works18) and the verified glossary in this dive’s source anchors.
- Foot — the lowest part of the pipe, which admits wind from the chest. On a small wooden flute the foot is often a short socket or simply the open bottom of the box that seats on the chest (OHS works18).
- Block — the solid wooden plug that fills the pipe just above the foot, as wide as the interior of the box. It is the wooden equivalent of a metal pipe’s languid: it very nearly closes off the foot from the body and, with the face, forms the windway (OHS works18). The hobby pages call it the core and cut it from beech, about 10 cm (100 mm) long (en_pijp).
- Face — the small plate on the front of the block that carries the upper lip; in a wooden pipe the upper lip is moulded or chiselled into this front slat rather than being a separate metal part (OHS works18; en_pijp).
- Flue / windway — the narrow slit between the block (and its face) and the lower lip through which the wind is squeezed into a flat, fast air-sheet aimed at the upper lip (OHS works18). This gap is the heart of the pipe: too wide and the pipe is windy and dull, too narrow and it starves.
- Lower lip — the lower edge of the mouth, formed by the top of the cap/front board below the mouth. It, together with the block, defines the windway and the angle at which the air-sheet leaves the pipe (OHS works18). The hobby method darkens the lower lip with a pencil — graphite on the wood — reportedly to help the airflow (en_pijp).
- Upper lip — the sharp edge the air-sheet strikes to set up the oscillation that drives the pipe (OHS works18). In this wooden build it is moulded into the front slat (the face) (en_pijp).
- Mouth — the rectangular opening between the lower and upper lips where tone is generated. Its width is the internal width of the pipe front; its height is the cut-up (§6).
- Body — the resonating tube above the mouth, running from the mouth up to the stopper (OHS works18).
- Stopper — the leather-padded wooden plug that closes the top of the body. Sliding it up and down tunes the pipe (OHS works18). The hobby build makes it from the remnant of the core (block) stock wrapped in leather (en_pijp); a camping-foam plug also works (jsart26).
Figure 2 — Labelled cross-section of a wooden stopped pipe. Wind enters the foot, is squeezed through the flue/windway between the block and the lower lip into a flat air-sheet, and strikes the upper lip carried on the face. The body resonates above the mouth; the leather-padded stopper closes the top and tunes the pipe by sliding. Anatomy after OHS works18 and en_pijp.
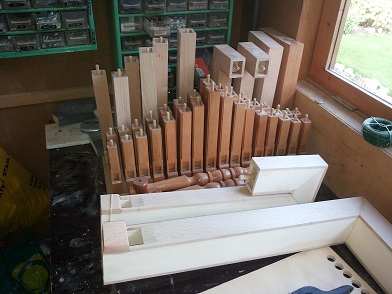
3.3 The boards and the wood
A wooden stopped flute is built from a small number of flat pieces. Naming them the way they will be glued:
- the back — the broadest board, running the full length of the pipe;
- two sides — glued to the edges of the back to raise three walls of the tube;
- the front (face slat) — the board above the mouth that carries the upper lip; the hobby build cuts this from beech, and moulds the upper lip into it (en_pijp);
- the cap — the short front board below the mouth, whose top edge forms the lower lip;
- the block (core) — the solid plug, beech, ~100 mm long (en_pijp), that fills the foot and, with the face, forms the windway.
For this first pipe the whole box can be beech, following the hobby page, which cuts the core from beech (~10 cm) and uses beech for the front slat too — the latter “because it looks more decorative and makes the pipe stronger” (en_pijp). Beech is close-grained, planes to a crisp lip edge, and holds the mouth geometry. The classic softwood pipe woods — fir or pine — are lighter and cheaper for the back, sides, and cap, and are the traditional choice for the body (general practice; the hobby pages lean on beech — treat fir/pine as the established alternative, est. for this build). Wood selection in depth is Vol 02’s subject.
Wall thickness for small busker flutes runs 2–3 mm (jsart26). Thin walls keep the pipe light and the internal cross-section correct, but they are exactly why the sealing and glue-up discipline of §5 matters: a 2–3 mm beech wall will swell and bow if a water-based glue or exhaled moisture soaks into it, and a bowed wall detunes or silences the pipe.
3.4 Worked dimensions for one middle-of-the-scale pipe
The build below is followed at a concrete set of dimensions for one middle-of- the-scale stopped pipe — the size the hobby pages photograph and describe. These are a coherent worked example, not a plan for a specific note: the exact body length depends on the target pitch and is finished by tuning with the stopper (§8), so the length is deliberately cut over-length and tuned down (est.; the “leave it long” rule follows the end-correction reasoning in the acoustics dive). The block length and the +0.5 mm cap relation are the hard sourced numbers (en_pijp).
Table 1 — 4. Worked dimensions for one middle-of-the-scale pipe
| Part | Dimension | Basis |
|---|---|---|
| Block (core) length | ~100 mm (10 cm) | en_pijp |
| Wall thickness (back, sides, cap, face) | 2–3 mm | jsart26 |
| Internal width (mouth width) | ~15 mm | worked example (est.) |
| Internal depth (front-to-back) | ~15 mm (roughly square section) | worked example (est.) |
| Body speaking length (mouth to stopper), cut over-length | ~150–170 mm, tuned down with the stopper | worked example (est.); tuning per §8 |
| Cap height above the core | set flush to +0.5 mm above the top of the core | en_pijp |
| Cut-up (mouth height) | ≤ 1/3 of the mouth width → ≤ ~5 mm for a 15 mm mouth | jsart42 |
| Windway (flue) gap | thin, uniform slit set by the cap-to-block fit; a card shim ~0.4–0.5 mm gives a repeatable slot | jsart26 (est. exact gap) |
| Stopper | core-stock remnant wrapped in leather, sliding fit in the body | en_pijp |
The single most important sourced relationship in that table for the build is the cap set flush to, or up to +0.5 mm above, the top of the core (en_pijp) — it fixes where the lower lip sits relative to the block and therefore the windway and the air-sheet. The single most important relationship for the mouth is the cut-up ≤ 1/3 the mouth width (jsart42) — §6.
3.5 Glue-up: building a square, airtight, thin box
The one rule that governs the whole box is that it must be square and airtight. A wooden flue pipe is a resonator; a wall that bows, a joint that leaks, or a racked section bleeds wind and dulls or kills the tone. Two hobby techniques carry this build.
3.5.1 Seal the inside first
Before the box is closed up, seal the interior surfaces with thinned PVA (jsart26). This is counter-intuitive to a woodworker used to gluing bare wood, but it is the fix for the thin-wall failure mode: sizing the inside faces with dilute PVA before assembly stops the water in the assembly glue (and later, exhaled moisture) from soaking into and swelling the 2–3 mm walls (jsart26). A swollen, bowed wall is the commonest reason a first pipe warps and goes dead. Seal, let it dry, then glue up.
3.5.2 Glue up flat against a spacer, weighted
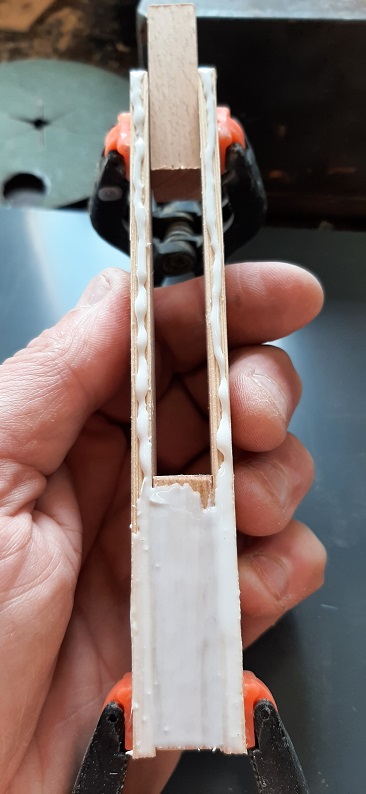
The thin box is glued on a flat side using the loose front board as a spacer, and weighted down with lead-filled cans on a steel bar or flat caul (jsart26). The method, step by step:
- Lay the back flat on the bench (over the shooting-board/caul from Vol 02).
- Glue the two sides to the edges of the back to raise the three-wall channel, checking each side square to the back with the try-square.
- Use the loose front (face slat) laid in the channel as a spacer — it holds the two sides at exactly the finished internal width while the glue sets, so the box cannot close up or splay (jsart26).
- Weight the assembly with lead-filled cans on a steel bar laid across the top, pressing the glue lines flat and tight while they cure (jsart26).
- When the sides are set, glue in the block (core) near the foot, square across the interior, its top face at the height that will place the windway correctly against the lower lip.
Square edges throughout come off the shooting jig from Vol 02, which planes an edge dead-square so the glue lines meet without gaps (jsart26). Any glue squeezed out of the joints is deliberately spread thin along the inside with a narrow stick to seal the end grain, then the box is left under the cans to cure. The result should be a light, straight, square-section tube, open at the top, with the block plugging the foot and the front left off below and above the mouth line until §6.
3.6 Cutting and forming the mouth
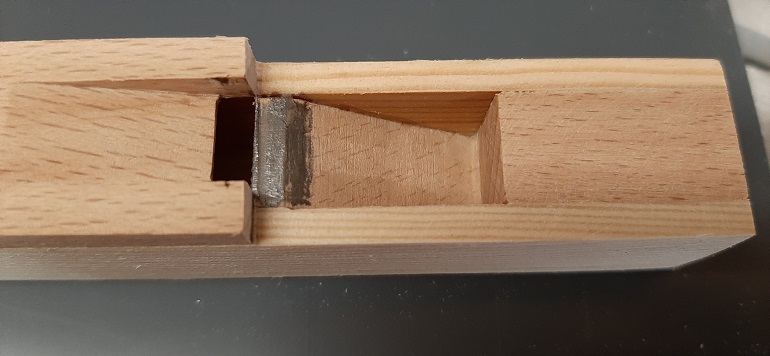
The mouth is where wind becomes sound, and it is where a first pipe is most often spoiled. Three parts are formed together: the cap below the mouth (carrying the lower lip), the face slat above it (carrying the upper lip), and the gap between the block and the lower lip (the windway).
3.6.1 The cap sits flush to +0.5 mm above the core
Fit the cap — the short front board below the mouth — so its top edge stands flush with, or up to 0.5 mm above, the top of the core (block) (en_pijp). This relationship sets the height of the lower lip relative to the block, and with it the width and aim of the windway. The hobby page notes the cap can be of thinner stock than the rest of the front and is set “equal or up to 0.5 mm upwards” relative to the core (en_pijp) — a small, deliberate step that tips the air-sheet toward the upper lip. Getting this 0 to +0.5 mm step right is worth more than any other single adjustment on the pipe.
3.6.2 Cut-up: mouth height is at most one-third the mouth width
The cut-up is the vertical distance from the lower lip to the upper lip — the height of the mouth. The one hard hobby rule is Bruce Thompson’s: “the cut-up should not exceed 1/3 the width of the mouth” (jsart42). For the worked example’s ~15 mm mouth width, that caps the cut-up at ~5 mm. Within that limit, a lower cut-up gives a brighter, stringier tone with more upper partials, and a higher cut-up gives a rounder, fluter tone; the general 1:3-to-1:4 mouth-height-to-width band is a rule of thumb (est.), and why cut-up trades brightness for roundness belongs to How Organ Pipes Make Sound, Vol 04 (Scaling and Voicing). For a first stopped flute, cut up toward the round end — start low within the limit and open it slightly if the pipe is dull, since it is far easier to remove a little more wood than to put it back.
3.6.3 The knife-cut-equal-to-the-cut-up trick
Forming a clean upper lip in the face slat is the delicate cut. Bruce Thompson’s method for a solid-block pipe transfers directly: make a knife cut on the inside of the face equal to the cut-up depth, then chisel the mouth slope up to that cut. When the sloping cut for the mouth meets the pre-scored knife line, the waste breaks away and leaves a clean, sharp upper-lip edge exactly at the intended cut-up, instead of the ragged or over-run edge that a freehand chisel leaves (jsart42). A slight rounding of the upper lip afterwards gives a smoother tone (jsart42). The upper lip itself is moulded into the front slat (the face) on the hobby build (en_pijp) — the knife-cut trick is how that moulded edge is left crisp.
3.6.4 Darken the lower lip
Finally, darken the lower lip with a pencil — rub graphite onto the lower-lip edge and the face of the cap the air-sheet passes over. The hobby page reports this helps the airflow across the lip (en_pijp); practically, the graphite leaves a hard, slick, slightly self-lubricating surface for the air-sheet to spring from. It is a small, cheap, reversible step and it is documented on the source pipe, so it belongs on the first build.
Figure 3 — Mouth geometry. Left: the mouth width W and the cut-up height, which must not exceed W/3 (jsart42). Right: in section, the cap sits flush to +0.5 mm above the block (en_pijp), and a knife cut on the inside of the face equal to the cut-up lets the chiselled mouth slope break away to a clean upper-lip edge (jsart42). Lower cut-up = brighter; higher = rounder — within the W/3 limit.
3.7 The leather-padded stopper
The top of the body is closed by the stopper — and on the hobby build it is made from the remnant of the core (block) stock, cut to a plug that fits the internal section of the body and wrapped in leather (en_pijp). The leather does two jobs at once: it makes the plug an airtight seal against the body walls (a leaky stopper is a half-open pipe and will not hold pitch or timbre), and it makes the plug a sliding fit with enough friction to stay where it is set but move under a firm push of the thumb. A camping-foam plug is a documented alternative that seals and slides the same way (jsart26).
Making it, step by step:
- Cut a plug from the leftover core (beech) stock to the pipe’s internal cross-section, a hair undersize (en_pijp).
- Wrap the sides in a strip of thin leather, glued on, so the leather is the bearing/sealing surface against the body walls.
- Fit it into the top of the body and check the slide: it should move under thumb pressure and hold its position against the working wind. Skive or add a layer of leather to tune the friction.
- Leave a short handle or tab proud of the top so the stopper can be gripped and slid for tuning without dropping it into the body.
Seal any wind-contact surface of the stopper stock as in §5.1 so it does not swell. The stopper is not glued — it must remain free to slide, because that slide is the tuning (§8).
3.8 First assembly and first speech
With the box glued square and sealed, the mouth cut, the lower lip darkened, and the stopper made, the pipe is assembled and blown for the first time.
- Set the stopper into the top of the body, pushed roughly to the position estimated for the target pitch (for the worked example, part-way down — the box was cut over-length, so the stopper starts well inside the body and the pipe is tuned down into pitch, est.).
- Seat the foot on the wind supply. At the bench this is the manometer-and- inflator rig from Vol 02, delivering the working pressure of ~5 in H₂O (127 mm) — voice at a known gauge with a pump, not by mouth, both to keep a repeatable pressure and to keep exhaled moisture out of the thin walls (jsart26). Wind pressure beyond this one number is the Wind Systems dive’s subject.
- Listen. A correctly-formed stopped flute should speak promptly and cleanly at working pressure — a round, hollow tone, quieter than a builder expects, with little chiff. If it speaks, the mouth geometry is close. If it does not, work the diagnostics in §9 before touching the tuning.
A first pipe that speaks — even out of tune — is a success: tuning is the easy part and comes next.
3.9 Voicing faults on a first stopped flute
Full voicing is Vol 07; a first pipe needs only the short list of faults that keep a new stopped flute from speaking, and their first-order fixes. Change one thing at a time and re-blow at the same gauge pressure.
- Windy, breathy, no clear pitch → the windway is too wide, or the cap sits too low relative to the core. Re-check the cap flush to +0.5 mm above the core (en_pijp); the air-sheet must be aimed at the upper lip, not below it.
- Weak, starved, slow to start → the windway is too narrow, or the pipe is leaking. Check the glue lines and the stopper seal (§7) first; a starved pipe is often a leaking pipe.
- Dull, no life → the cut-up is too high (within the ≤ W/3 limit) — open the mouth slightly, a hair at a time, since wood cannot be put back (jsart42).
- Screams / overblows / too bright → the cut-up is too low — this is the fault to avoid by starting low but not extreme; a slight rounding of the upper lip softens an over-bright pipe (jsart42).
- Speaks, then goes flat/dull after handling → a wall has swollen from moisture. This is the thin-wall failure mode; the prevention (seal inside first, voice with a pump not by mouth) is in §5.1 and step 2 above (jsart26).
Only when the pipe speaks cleanly is it worth tuning.
3.10 Tuning by stopper position
The stopped flute’s defining convenience is that it tunes by the position of its stopper, over a wide range, with no cutting. Sliding the stopper in (down into the body) shortens the effective air column and raises the pitch; sliding it out (up toward the top) lengthens the column and lowers the pitch (OHS works18; en_pijp). Because the worked-example box was deliberately cut over-length, the pipe is brought to pitch by pushing the stopper in until the note is right — the pipe is tuned down into pitch from the long side, which is the forgiving direction (a too-short pipe can only be pulled flat by drawing the stopper almost out of the top, and runs out of room).
To tune:
- Blow the pipe at the working gauge (~5 in H₂O) against a reference — a tuner, a fork, or the neighbouring pipe in the rank.
- Push the stopper in to raise the pitch, draw it out to lower it, moving it in small increments and re-blowing after each.
- Settle on the position where the pipe is at pitch (or a hair sharp, to allow for the pipe settling), and mark the stopper stem so the setting can be found again.
Because the stopper is a friction/leather fit (§7), it holds the setting under wind but can be re-set later as the whole rank is tuned to a temperament — the temperament itself, and equal- versus meantone tuning of a busker rank, is Vol 07 and the sibling tuning references. What matters for the first pipe is the principle proven on the bench: one plug, slid by thumb, tunes the whole pipe — the reason the gedeckt is where every pipe builder should start.
Figure 4 — Tuning by stopper position. Pushing the leather-padded stopper in shortens the effective air column and raises the pitch; drawing it out lengthens the column and lowers it (OHS works18; en_pijp). A pipe cut over-length is tuned down into pitch from the long side — the forgiving direction.
3.11 What the first pipe teaches, and where next
A completed stopped flute proves the four skills every later pipe in this dive depends on: gluing a thin box square and airtight with the inside sealed first (§5), setting the cap flush to +0.5 mm and cutting a clean mouth to the ≤ 1/3 cut-up rule (§6), making a leather stopper that seals and slides (§7), and voicing at a known gauge with a pump rather than by mouth (§8–9). It also proves, by hand, the relationship this whole dive rests on: a stopped pipe sounds an octave lower than an open pipe of the same length, gives a round, odd-harmonic tone, and tunes by its stopper.
The next volume, Open Flue Pipes & Scaling (Vol 04), opens the top of the box: the open pipe sounds at its own length’s pitch (open f₁ ≈ c/2L), is tuned by its physical top rather than a stopper, gives the full harmonic series and a brighter voice, and introduces scaling a rank — Töpfer’s principle that pipe diameter falls more slowly than pitch (the halving number h = 17), applied to a small busker rank. The stopped flute built here remains the tonal backbone of the organ those brighter ranks sit on. For the acoustics behind every “why” in this volume, see How Organ Pipes Make Sound; for the wind that drives these pipes, see Wind Systems; and for the instrument this rank is being built toward, see The John Smith Universal Organ.
Comments (0)