Building Organ Pipes · Volume 2
Building Organ Pipes — Vol 02: Wood, Tools & the Workshop
A busker organ pipe is a small wooden box that has to hold an air-sheet steady to a fraction of a millimetre and keep doing it, in tune, through years of damp Sunday afternoons and the builder’s own breath. Almost every failure a first-time pipe-maker meets — a rank that speaks bright one week and dull the next, a stopped flute whose walls have bowed so the stopper binds, a mouth that has crept out of square — traces back to a decision made before any tone was ever coaxed out of the pipe: which wood, cut which way, sealed how, glued with what, cut to what tolerance. This volume is about those decisions, and about the small kit of tools and jigs that let an amateur hit them repeatably.
It does not cover why a pipe makes its note, how long to cut it, or how much wind to feed it. The physics of the edge tone and the standing wave lives in the sibling dive “How Organ Pipes Make Sound”; wind pressure and bellows live in “Wind Systems”. This volume stays in the workshop: timber, glue, bench, jig, and the one bench instrument — a water manometer — that lets a builder voice a pipe at a known pressure instead of by lung.
2.1 Timber selection
There is no single “correct” pipe wood, and any source that tells a beginner otherwise is describing one workshop’s habit. The published busker-organ record shows the same pipe family built successfully from at least four different woods, and the right way to read that record is by whom, not by decree.
2.1.1 Body and board woods (the walls and back)
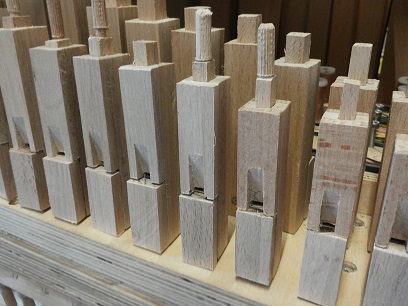
The body of a flue pipe — the four long boards that make the resonating box — wants a straight-grained softwood: light, stable, easy to plane to a thin even wall, and quiet under the jet. The documented choices split as follows.
- Fir — this is what Walter Höffle’s 20-note plan actually specifies for the pipe bodies. It is the reference wood for the flagship hobby 20-note design (the Carl Frei / Raffin scale), and a builder working from the plan as drawn is working in fir.
- Beech — the most common substitution, chosen for tone rather than faithfulness to the plan. The builder of one 20-key Höffle organ used beech throughout “because i like the sound of it” in place of the plan’s fir (en_bouwhoeffle); the 31-note Ulrich Stille build likewise uses beech pipes (en_31toets), and the “how to make a pipe” walkthrough uses beech for the core and front slat (en_pijp). Beech is technically a hardwood — denser and harder to work than fir — so choosing it is a deliberate trade of extra effort for a firmer, more “singing” wall.
- Canadian white wood / pine — a 26-note “Universal” builder cut his pipes from Canadian white wood reclaimed from old library shelves (jsart19): cheap, well-seasoned, straight, and to hand. “Pine” in the general softwood sense sits in the same slot.
- Cedar — recommended specifically over balsa for small pipe work (jsart26): light and stable, and unlike balsa it holds an edge at the mouth.
The honest summary is that fir is the plan wood, and beech, pine/Canadian white wood, and cedar are all attested builder substitutions — each traceable to a named source, none of them wrong. A first rank is best built from whatever straight, dry, quarter-cut softwood the builder can plane confidently and get consistently; matching the whole rank from one board matters more than the species.
2.1.2 Harder woods for block, face, lips and core
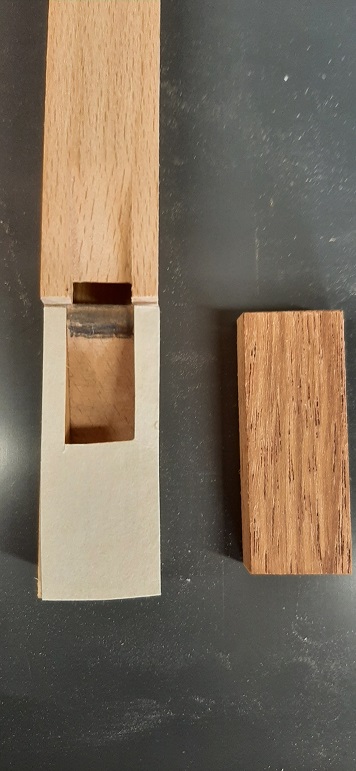
The parts that form and split the air-sheet — the block (the wooden equivalent of a metal pipe’s languid), the face carrying the upper lip, the lower lip, and the core of a stopped pipe — want a harder, closer-grained wood than the body, because their edges have to be cut cleanly and stay sharp. A fuzzy or crumbling upper-lip edge is a pipe that will never speak crisply.
- Beech is the hobby default here too: en_pijp forms the core (~10 cm long) and the front slat that carries the upper lip from beech.
- Pear and maple are the traditional close-grained choices for blocks and lips
in classical wooden-pipe work
(est.)— not named in the hobby build pages, but the long-standing cabinet-and-organ practice for a part that must take and keep a knife-cut edge.
A practical shop rule: build the box from the lighter body wood, and reserve a small offcut of something denser and finer — beech, pear, or maple — for the block, face and lips. Full pipe anatomy (foot, block, face, flue/windway, lower and upper lip, mouth, body, cap/stopper) is defined and illustrated in Vol 3, “The Stopped (Gedeckt) Flute.”
2.1.3 Grain, quartersawn stock, and seasoning
Two grain properties matter for a thin pipe wall:
- Straight grain along the board. Grain that runs off the edge is grain that will lift and tear when the mouth is cut, and that will pull the wall out of true as humidity changes.
- Quartersawn (radial) stock — where the growth rings run roughly perpendicular
to the wide face — moves far less across its width than flat-sawn stock, so a
quartersawn wall stays flatter and the stopper keeps sliding freely
(est.). This is a traditional stability preference rather than a number any hobby page states, so it is flagged as an estimate, but it is cheap insurance: a plane through the endgrain of a candidate board shows the ring angle in a few strokes.
Seasoning is non-negotiable. Pipe wood must be dry and dimensionally settled before it is cut — kiln-dried or long air-dried and then rested in the workshop for weeks so it reaches the shop’s own humidity. Building from damp or freshly bought stock guarantees that the walls will move after assembly, and a pipe whose walls have moved is a pipe whose mouth geometry, and therefore whose voice, has moved with them.
2.1.4 The recurring failure mode: moisture in thin walls
The single most common way a homemade pipe goes wrong is water swelling a thin wall — and there are two water sources, one obvious and one not.
- Water-based glue. Thinned PVA (the standard glue, below) is mostly water. Wet glue laid on a 2–3 mm wall swells that wall locally and, as it dries unevenly, warps it (jsart26). The fix is to seal the inside of every board with thinned PVA before assembly, so the joint glue meets a sealed surface and cannot soak in (jsart26).
- The builder’s own breath. The traditional way to test and voice a pipe is to blow it by mouth. Exhaled air is warm and saturated with moisture, and repeatedly blowing a thin unsealed pipe drives that moisture straight into the wall — the same swelling and warping, arriving through the mouth instead of the joints (jsart26). This is the reason a bench voicing rig (Section 5) exists at all: it lets the builder voice with dry pump air at a known pressure and never breathe into the wood.
Both sources point to the same discipline: seal first, and keep breath out of the pipe. Sealing is covered next.
2.2 Sealing
Sealing does two jobs: it stops water (glue and breath) from reaching the wood, and it hardens and smooths the internal surfaces so the air-sheet runs clean. The busker record gives three approaches, each from a named builder.
Table 1 — 2. Sealing
| Sealer | Where it is used | Source |
|---|---|---|
| Thinned PVA, inside, before assembly | Sizes the inner faces of the boards so joint glue and any later moisture cannot soak into the wall; done before the box is glued up | jsart26 |
| Cellulose sanding sealer | Used to seal MDF pipe cases; dries hard and fast, sands to a smooth internal surface | jsart19 |
| Varnish, avoiding the mouth | A moisture-proofing coat on the finished pipe; the mouth and lip edges are deliberately left bare so the coating does not round or clog the tone-forming edges | en_pijp |
Two points a beginner routinely gets wrong:
- Seal before you assemble, not after. The inside of a finished pipe is nearly impossible to reach; the time to size the inner faces with thinned PVA is while the boards are still flat on the bench (jsart26).
- Keep any coating off the working edges. en_pijp is explicit that varnish applied for moisture protection must avoid the mouth. A blob of sealer or varnish on the upper lip or the flue changes the geometry the pipe was voiced to, and typically dulls or chokes the speech. The lower lip, in fact, is often deliberately darkened with pencil rather than sealed, to help the airflow (en_pijp) — the opposite of coating it.
2.3 Glues
Four adhesives cover everything a busker-organ pipe-maker needs. The workhorse is thinned PVA; the others solve specific problems.
Table 2 — 3. Glues
| Glue | Strengths | Weaknesses | Role in pipe work |
|---|---|---|---|
| Thinned PVA | Cheap, strong, easy, doubles as sealer/size for tube interiors and rolled-paper tubes | Water content swells thin walls; must seal-first and clamp | The default for all box joints and paper tubes (jsart09, jsart26, jsart51) |
| Hide glue | Traditional; rigid glassy joint; reversible with heat/moisture for future repair (est.) | Needs warming; short open time; fussier to use | The classic choice where a repairable joint is wanted (Audsley) (est.) |
| Epoxy | Gap-filling, waterproof, strong on end-grain and dissimilar materials (est.) | Irreversible, heavier, adds mass and cost (est.) | Occasional problem joints, not general box assembly (est.) |
| Beeswax | Low-temp, remeltable, no water | Not structural | Mounting free-reed plates — melted on with a soldering iron, the plate itself not heated (jsart51) |
2.3.1 Thinned PVA — the workhorse and its trade-off
PVA (polyvinyl acetate, ordinary white woodworking glue) thinned with a little water is the glue behind essentially every busker pipe in the source record. It bonds the box joints, and — thinned further — it sizes the inside of tubes and soaks into rolled-paper resonators to stiffen them (jsart09, jsart26, jsart51). Its one real drawback is the one already met in Section 1.4: it is a water-based adhesive, and water swells thin wood. The whole clamp-and-weight, seal-first workflow in Section 4 exists to manage that single trade-off. Used with that discipline, thinned PVA is all most builders ever need.
2.3.2 Hide glue, epoxy, beeswax
Hide glue is the traditional organ-builder’s adhesive: a hot animal glue that
dries to a hard, rigid, almost glassy joint and, crucially, is reversible — a
future repairer can warm and part the joint without destroying the wood (est.). The
hobby pages do not name it, but it is the classic choice cited by Audsley and worth
knowing for a pipe meant to be serviced decades on. Its cost is convenience: it must
be warmed, and its open time is short.
Epoxy is waterproof and gap-filling, useful for an awkward end-grain or
mixed-material joint (est.). It is deliberately not recommended for general box
assembly: it is irreversible, heavier, and adds mass where a light stiff wall is
wanted.
Beeswax is not a structural glue at all — it appears in pipe work for exactly one job, mounting the aluminium reed-plate of a free-reed (“melodica trumpet”) pipe. The plate is bedded in wax melted with a soldering iron, and the instruction is emphatic that the plate itself must not be heated, only the wax around it (jsart51). The free-reed voice is built in full in Vol 6, “Reed Pipes & Special Voices.”
2.4 The tool kit, jigs and fixtures
Pipe-making is small, precise joinery. The kit is modest; the jigs are what turn a modest kit into repeatable results.
2.4.1 The tool kit
A workable busker-pipe kit:
- Marking and measuring — a good steel rule, a small engineer’s square, a marking gauge, a sharp marking knife, and a fine pencil (also used to darken the lower lip, en_pijp).
- Cutting — a fine-tooth backsaw or razor saw for cross-cuts, and a fret/coping saw for the mouth cut-out.
- Planing and truing — a low-angle block plane and a shooting board (Section 4.2) for squaring edges.
- Paring and the mouth — a set of sharp bench chisels; the upper lip of a traditional block-and-face pipe is chiselled into the face, so a keen, correctly ground chisel is central, not optional (jsart42).
- Boring — Forstner bits for the foot hole (jsart09 uses a 5/8″ Forstner in the piccolo block).
- Clamping and weighting — light clamps, and lead-filled cans used as gluing weights (Section 4.3, jsart26).
- Finishing — fine abrasive papers, and brushes for sealer/varnish kept well away from the mouth.
Nothing here is exotic. The precision comes not from the tools but from the jigs that constrain them.
2.4.2 The shooting jig — square edges
A flue pipe is four boards meeting at right angles; if the edges are not dead square and straight, the box will not close cleanly, the walls will not be parallel, and the mouth will not sit true. The remedy is a shooting jig (shooting board): a fence and a runway that hold the board while a plane, laid on its side, shaves the edge perfectly square to the face (jsart26). Passing every board edge across the shooting board before glue-up is the difference between a box that clamps up square with light pressure and one that has to be forced — and a forced box is a stressed box that will move.
2.4.3 The glue-up: flat side, loose-front spacer, weighted cans
Clamping a thin four-sided box square without crushing it is awkward with ordinary clamps. The busker method sidesteps clamps almost entirely (jsart26):
- Assemble lying on one flat side on a flat bench, so gravity holds the parts coplanar and the bench itself is the reference surface.
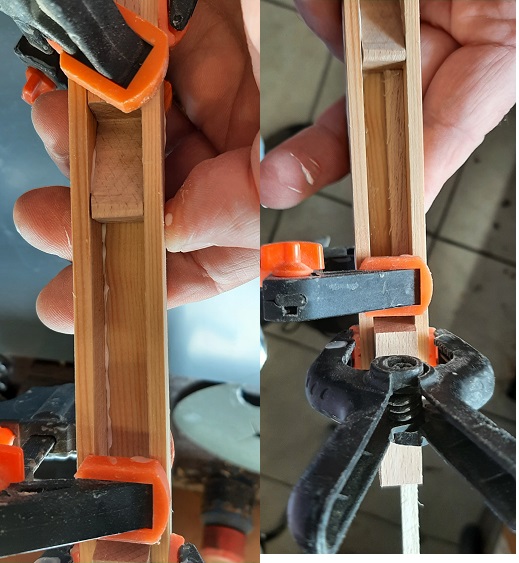
- Use the loose (not-yet-glued) front board as a spacer slid into the box. It sets the internal width exactly and keeps the two sides parallel and square while the glued joints set — then it lifts straight out.
- Weight the assembly with lead-filled cans rather than clamping it. The dead weight presses the glued faces together evenly, with no point loads to bow a thin wall. Setting the cans on a steel bar across the pipe spreads the load further.
Because the inside faces were sealed with thinned PVA first (Section 1.4), the water in the joint glue cannot soak into the walls while all this is setting, and the box comes off the bench flat and square. Figure 1 (right) shows the arrangement.
2.5 Wall thickness and tolerances
At busker scale the walls are thin and the tolerances are tight, because the parts that make the tone are small.
- Small pipes: 2–3 mm walls (jsart26). Thin enough to keep the pipe light and the interior at its designed cross-section, thick enough to plane true, hold a glue joint, and take the mouth cut without splitting.
- Larger bass bodies: thicker walls
(est.). A big stopped bass pipe needs a stiffer wall to stay flat over its greater span and to keep its heavier stopper running true; the exact figure scales with the pipe and is not stated as a number in the hobby sources, so it is flagged as an estimate.
The tolerances that matter most are not the wall thickness itself but the geometry the wall carries — the flue width, the cut-up (mouth height), and the squareness of the mouth. Those are set in tenths of a millimetre and are where the shooting board and the spacer-and-weight glue-up pay off. The mouth ratios themselves (the cut-up “should not exceed 1/3 the width of the mouth,” jsart42) and their tuning belong to the pipe-build volumes: the stopped flute in Vol 3, the open flue pipe and scaling in Vol 4, and voicing and tuning in Vol 7.
2.6 The bench voicing rig
The last piece of the workshop is not a woodworking tool at all: it is a way to blow the pipe on the bench at a known, steady pressure, with dry air, so the builder can voice by ear and eye without ever breathing into the wood. Two reasons make this worth a small permanent bench setup rather than a puff of breath:
- Moisture. As Section 1.4 established, exhaled air is warm and wet, and blowing a thin pipe by mouth drives that moisture into the wall (jsart26). Pump air is dry.
- Repeatability. Lung pressure is neither steady nor known. A pipe voiced by mouth is voiced at a pressure the builder cannot reproduce, so it may not behave the same on the organ’s own chest. A pipe voiced at a measured gauge pressure that matches the organ will.
2.6.1 The manometer plus inflator
The rig is deliberately simple (jsart26):
- An inflator or pump — a small foot pump, aquarium pump, or squeeze bulb — feeds wind to the pipe under test.
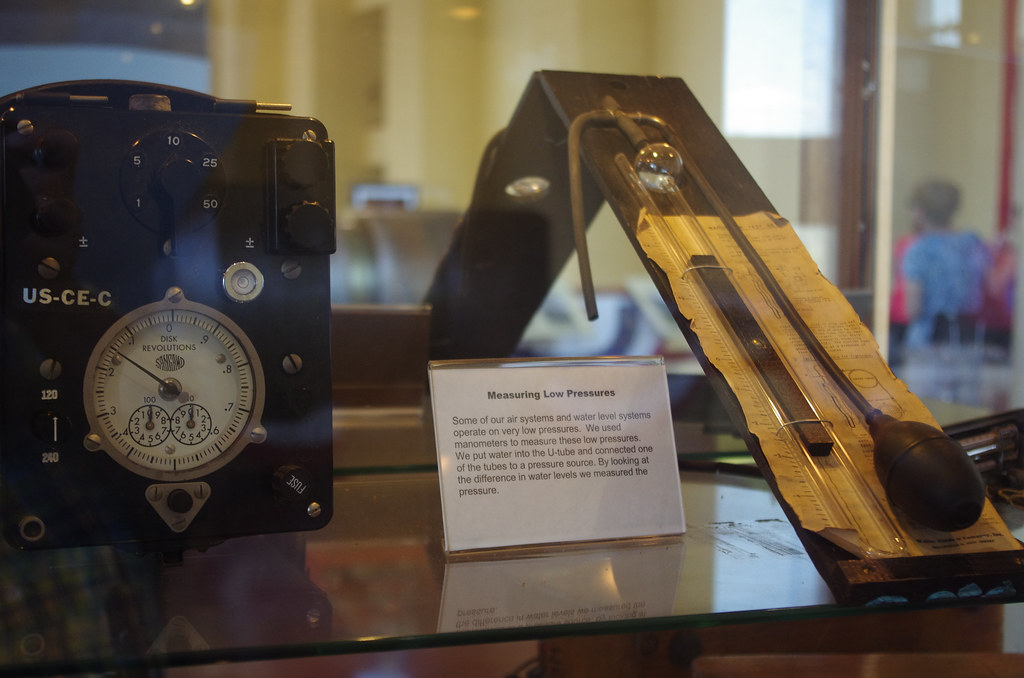
- A U-tube water manometer — a clear U-shaped tube part-filled with water, teed into the same wind line — reads the gauge pressure directly as the difference in the two water column heights. No calibration is needed: the height difference is the pressure, in inches or millimetres of water column, which is exactly the unit organ builders quote wind in.
The builder sets the pump to bring the water columns to the target difference, then adjusts flue, cut-up and lips while the pipe speaks at that fixed pressure.
2.6.2 What pressure — and where the wind theory lives
Busker organs run at low wind. The John Smith 20-note busker organ speaks at ≈ 5 in H₂O, i.e. 127 mm of water column, about 1.245 kPa (the busker standard used across this program; see The John Smith Universal Organ); a John-Smith-pattern 26-note build ran its bass chest a little higher at ≈ 6½ in H₂O (jsart19 — John Pettifer’s 26-note organ). Voicing a pipe at ≈ 5 in H₂O on the bench means it will behave the same when it reaches the organ.
That single number is all this dive needs from wind theory. Everything else about wind — bellows, reservoirs, regulation, why a busker organ settles near 5 in H₂O — is the subject of the sibling dive “Wind Systems.” This volume’s only interest in pressure is that the manometer lets the builder match it exactly, on dry air, at the bench.
2.7 Putting the workshop in order
The through-line of this volume is that a good pipe is decided at the bench before it
is voiced. Choose straight, seasoned, quarter-cut stock — fir if following Höffle’s
plan, beech, pine/Canadian white wood, or cedar if following the builders who
substituted them (en_bouwhoeffle, en_31toets, en_pijp, jsart19, jsart26) — and reserve
a harder, closer-grained offcut (beech, or pear/maple in the traditional way (est.))
for the block, face and lips. Seal the inner faces with thinned PVA before assembly,
keep every coating off the mouth (en_pijp, jsart26), and glue up square on a flat side
with the loose front as a spacer under weighted lead-filled cans (jsart26). Hold the
walls to 2–3 mm on small pipes (jsart26), true every edge on a shooting board, and
mind that the real precision is in the mouth geometry the walls carry. Finally, voice
on the bench at a measured ≈ 5 in H₂O with a pump and a U-tube manometer rather than by
mouth (jsart26, jsart19) — the discipline that keeps thin walls dry and pipes in tune.
With the workshop, wood, glue and rig in hand, the first pipe follows. Vol 3, “The Stopped (Gedeckt) Flute,” builds the simplest and most forgiving pipe end to end — the natural first cut for a new pipe-maker.
2.8 Cross-references
- “How Organ Pipes Make Sound” (Track 1, acoustics) — why the pipe speaks: edge/jet tone, standing waves, cut-up and tone, open vs stopped. This volume defers all such physics to it.
- “Wind Systems” (Track 1) — bellows, reservoirs and regulation; owns the ≈ 5 in H₂O wind this volume only voices to.
- Vol 3, “The Stopped (Gedeckt) Flute” — full pipe anatomy and the first end-to-end build, using the wood, sealing, glue-up and rig set out here.
- Vol 4, “Open Flue Pipes & Scaling” and Vol 7, “Voicing, Tuning & Reference” — the mouth ratios and voicing methods this volume’s tolerances feed into.
- “The John Smith Universal Organ” and “The Hobby Crank Organ” — the worked busker builds a reader may be building toward; sources overlap with this volume.
2.8.1 Source tokens used
en_bouwhoeffle, en_31toets, en_pijp (hobbycrankorgan.com); jsart09 (John Smith,
piccolo pipes), jsart19 (John Pettifer, 26-note build), jsart26 (Tony Goldsworthy,
pipe-making tips), jsart42 (Bruce Thompson, block-and-face pipe) on melright.com/busker;
Audsley, The Art of Organ Building (traditional glue/wood practice). Items marked
(est.) are traditional norms not stated in the hobby sources.
Comments (0)